Configure GALAXY Processors
Spacemap Go Help
The steps listed below assume that the audio and network connection instructions have been completed.
Select one of the three possible scenarios listed below for the appropriate configuration steps:
Configure Galileo GALAXY Hardware – New Processor
The “New Steps” below overwrite all the processor settings and stored Snapshots. Follow these steps to upload new firmware and reboot Galileo GALAXY processors to Spacemap Mode.
The following procedures update the GALAXY processor firmware and boot the processor(s) to Spacemap Mode.
Compass software includes an option to update all connected processors simultaneously. When configuring multiple processors, it is more efficient to connect the processors and the Compass computer to a standard or Avnu-certified network switch.
AVB Connection Management
Compass software manages the AVB connections of GALAXY processors in Normal Mode.
Spacemap Go manages AVB connections of processors in Spacemap Mode.
Entity and Group Names
Each AVB device has an Entity Name, a human readable identification of a specific AVB device. Use unique Entity Names for each GALAXY processor and all other AVB devices.
Each AVB device also has a Group Name, a human readable label that is used to group devices for control.
IMPORTANT: When a GALAXY processor is in Spacemap Mode, Spacemap Go manages the AVB connections of all GALAXY processors that have the same Group Name, even if some processors are in Normal Mode. Use a different Group Name for Normal Mode processors, allowing AVB connection management using Compass software. AVB connections for the Normal Mode processor are not possible until the Group Name is changed to one that does not include a processor in Spacemap Mode.
New Step 1: Power on the network switch (if used), Wi-Fi access point, and all GALAXY processors.
New Step 2: Download, install, and launch the current version Compass software (4.8 or later).
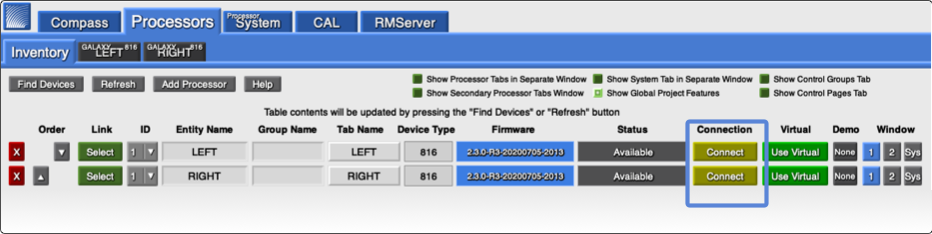
New Step 3: Select the PROCESSORS > INVENTORY tab.
NOTE: Processors should be auto-discovered and listed. If not, click the FIND DEVICES button.
New Step 4: Click CONNECT for each processor used in the Spacemap System. Click through the firmware warning message.

Compass Software – Inventory Tab, Click Connect and Firmware Mismatch Warning
New Step 5: Select the tab related to the first processor.
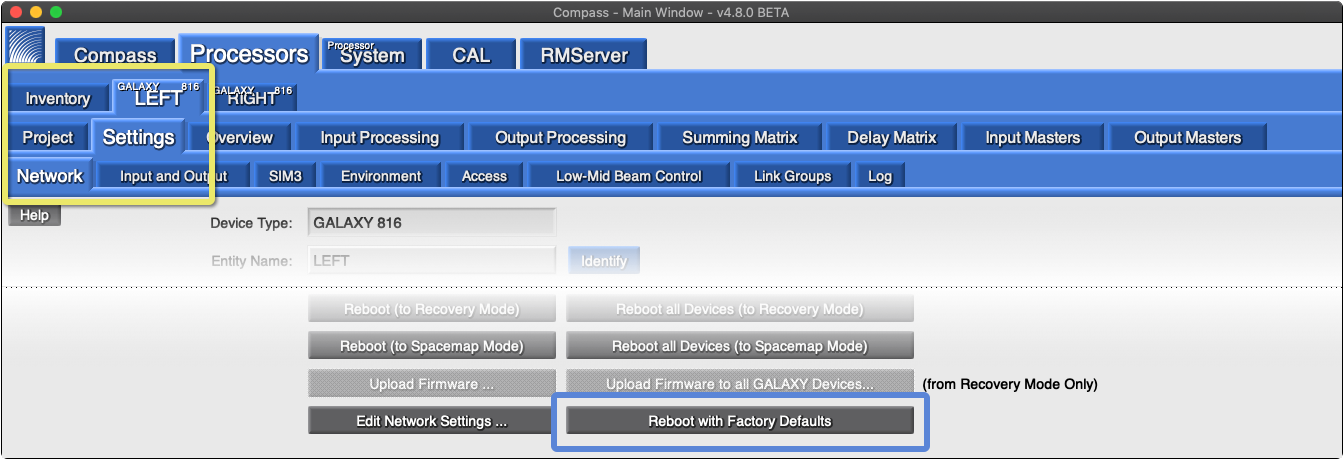
New Step 6: Select the SETTINGS > NETWORK tab.
New Step 7: Click the REBOOT WITH FACTORY DEFAULTS button.
Repeat Step 7 for each processor.
NOTE: The processor(s) will disconnect from Compass while rebooting (about 45 seconds) and then reconnect.
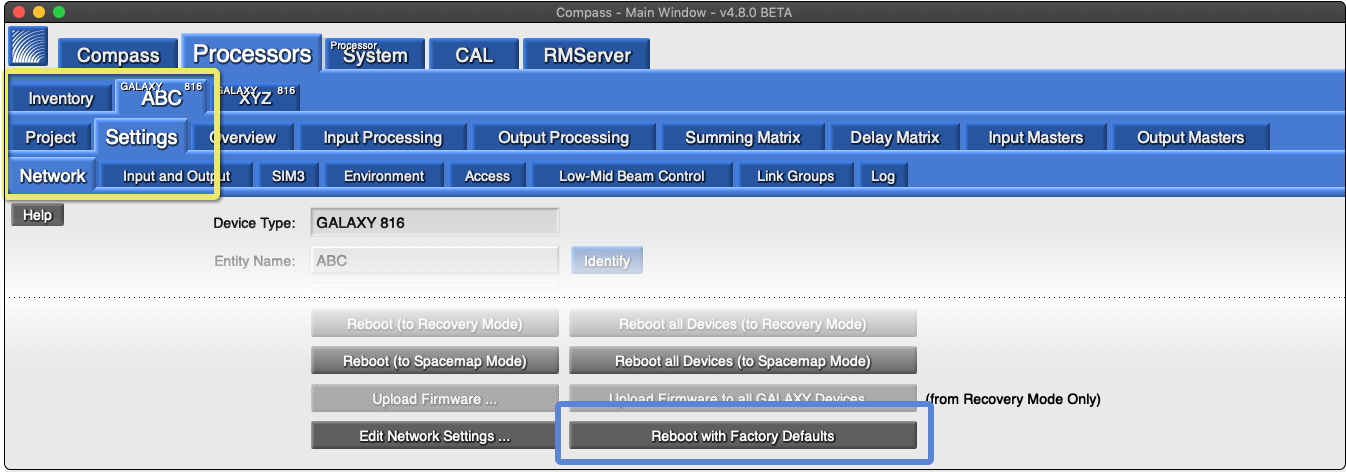
Compass Software – Network Tab, Click Reboot with Factory Defaults
New Step 8: Enter an Entity Name—unique for each processor (e.g., SMG-1, SMG-2…).
New Step 9: Enter a Group Name—use an identical name for all processors of a Spacemap System (e.g., show or venue name).
Repeat Step 8 and 9 for each processor.
NOTE: All processors require the same Group Name to be recognized as part of a Spacemap System.
NOTE: The Entity and Group Names cannot be changed after the processor is booted to Spacemap Mode.
NOTE: Multiple Spacemap Systems can be created by using a different Group Name for the processors of additional system(s).
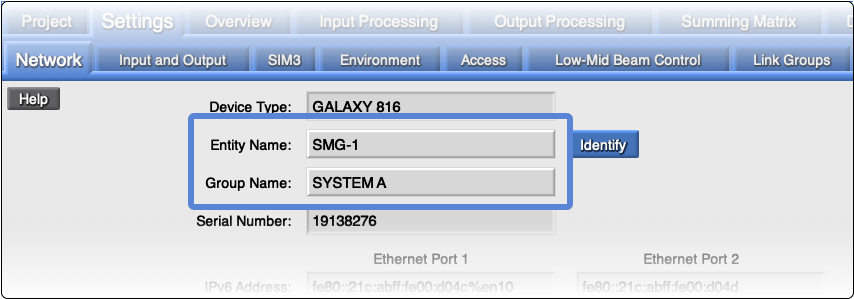
Compass Software – Network Tab, Enter Entity Name (Unique) and Group Name (Identical for All Processors)
New Step 10: Click the REBOOT ALL DEVICES (TO RECOVERY MODE) button.
NOTE: The processor(s) will disconnect from Compass while rebooting (about 30 seconds) and then reconnect in Recovery Mode.
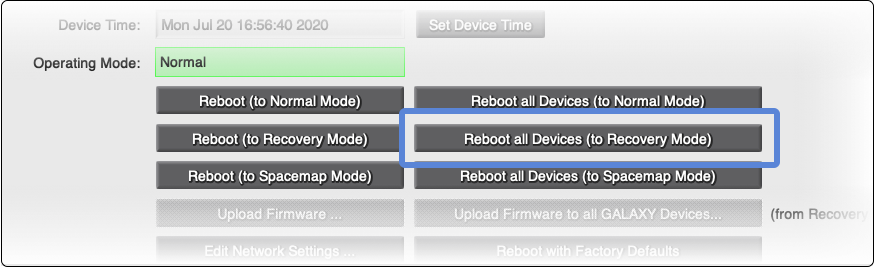
Compass Software – Reboot to Recovery Mode
New Step 11: Click the UPLOAD FIRMWARE TO ALL GALAXY DEVICES button.
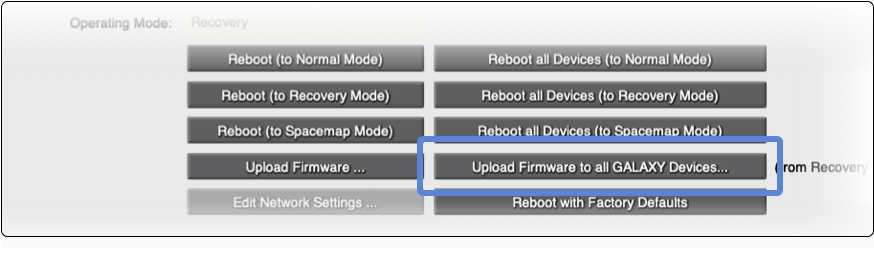
Compass Software – Upload Firmware to all GALAXY Devices
New Step 12: Select the .galaxyFirmware file included with the Compass software. The firmware version will be newer than the illustration below.
Default Compass installation directories:
- MacOS: /Applications/Compass <current version>/
- Win: /Program Files (x86)/Meyer Sound/Compass <current version>/
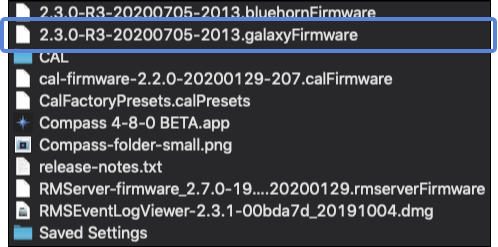
MacOS Finder – Compass Directory Files, GALAXY firmware file
New Step 13: Click OPEN to start uploading the firmware.
NOTE: The processor(s) will disconnect from Compass during the upload and reboot process (about three minutes) and then reconnect in Normal Mode.
New Step 14: Click the REBOOT ALL DEVICES (TO SPACEMAP MODE) button.
NOTE: The processor(s) will disconnect from Compass while rebooting (about 30 seconds) and then reconnect.
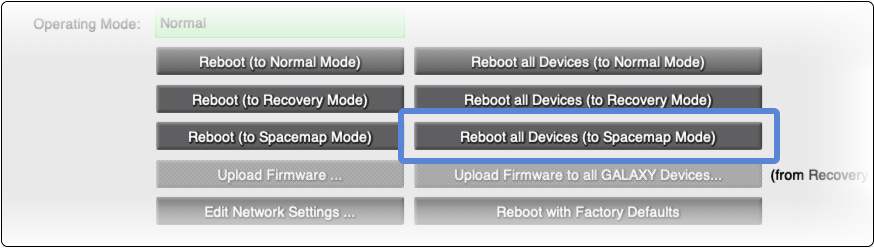
Compass Software – Reboot to Spacemap Mode
Compass indicates that a processor is in Spacemap Mode by changing the color of the processor tab.
Compass Software – Tab Color Indicates Spacemap Mode
New Processor Steps Completed. The configuration steps for the GALAXY processors are now complete.
Label Outputs
For each GALAXY processor, label the outputs. These names can also be entered and edited in the Spacemap Go app. Output names usually describe a loudspeaker model or location, e.g., “ULTRA-X40 Left” or “Main Left.” Input names are entered using the Spacemap Go app.
System Optimization
The input and output processing of GALAXY processors is active when using the Spacemap Go app. The processing settings are stored and recalled with a System Snapshot, part of a Spacemap Project, in the Spacemap Go app.
Use the output processing of the GALAXY processor(s) to make any system optimization adjustments at this time. The matrix cross-point levels will be overwritten and adjusted when Spacemap Go is connected.
NOTE: Compass software and Compass Go are not used after optimization adjustments are made.
IMPORTANT: Do not store or recall Snapshots with Compass software or Compass Go while operating a Spacemap System. The Spacemap Go app manages the storage and recall of GALAXY processor settings.
What’s Next?
Please visit the Quick Start page next.
For personal assistance, please visit: www.meyersound.com/contact, and select Technical Support and use the form to create a support case.
Configure Galileo GALAXY Hardware – In-Use Processor
The “Use Steps” below preserve the settings of the input and output processing of Galileo GALAXY processors (EQ, delay, gain adjustments, etc.) by storing and recalling a GALAXY Snapshot before and after recalling factory defaults. The matrix levels will later be overwritten by Spacemap Go. Make any necessary Output Channel Gain adjustments to compensate.
The following procedures update the GALAXY processor firmware and boot the processor(s) to Spacemap Mode.
Compass software includes an option to update all connected processors simultaneously. When configuring multiple processors, it is more efficient to connect the processors and the Compass computer to a standard or Avnu-certified network switch.
AVB Connection Management
Compass software manages the AVB connections of GALAXY processors in Normal Mode.
Spacemap Go manages AVB connections of processors in Spacemap Mode.
Entity and Group Names
Each AVB device has an Entity Name, a human readable identification of a specific AVB device. Use unique Entity Names for each GALAXY processor and all other AVB devices.
Each AVB device also has a Group Name, a human readable label that is used to group devices for control.
IMPORTANT: When a GALAXY processor is in Spacemap Mode, Spacemap Go manages the AVB connections of all GALAXY processors that have the same Group Name, even if some processors are in Normal Mode. Use a different Group Name for Normal Mode processors, allowing AVB connection management using Compass software. AVB connections for the Normal Mode processor are not possible until the Group Name is changed to one that does not include a processor in Spacemap Mode.
NOTE: Switching between Snapshots in Compass while using Spacemap Go app may result in inconsistent snapshot behavior.
Follow these steps to save existing input/output processing settings, upload firmware and reboot Galileo GALAXY processors to Spacemap Mode. The saved processor settings will be recalled during the procedure.
Use Step 1: Power on the network switch (if used) and all GALAXY processors.
Use Step 2: Launch the currently used version of Compass software.
Use Step 3: Click the PROCESSORS > INVENTORY tab.
NOTE: Processors should be auto-discovered and listed. If not, click the FIND DEVICES button.
Use Step 4: Click CONNECT for each processor used in a Spacemap System.
Compass Software – Click CONNECT for Each Processor
Use Step 5: Select SHOW GLOBAL SNAPSHOT FEATURES, upper-right.
Use Step 6: Click GLOBAL SNAPSHOT OPTIONS button, lower-right.
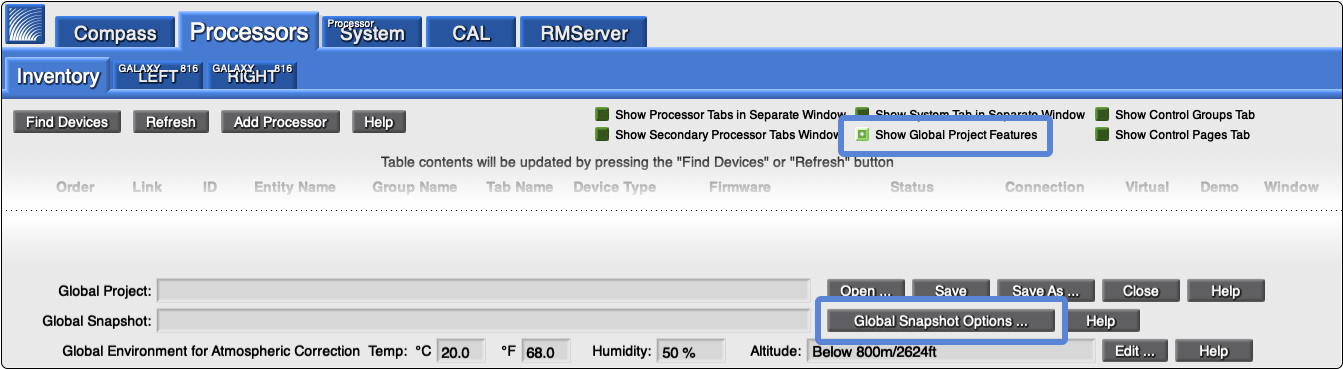
Compass Software – Inventory Tab, Show Global Project Settings and Global Snapshot Options
Use Step 7: Click CREATE NEW in the pop-up dialog.
Use Step 8: Enter the Snapshot name: SMG MIGRATION; click OK and CLOSE.
NOTE: This step creates a Snapshot in each GALAXY named SMG MIGRATION, which is recalled later and then saved by the Spacemap Go app as a Spacemap System Snapshot.
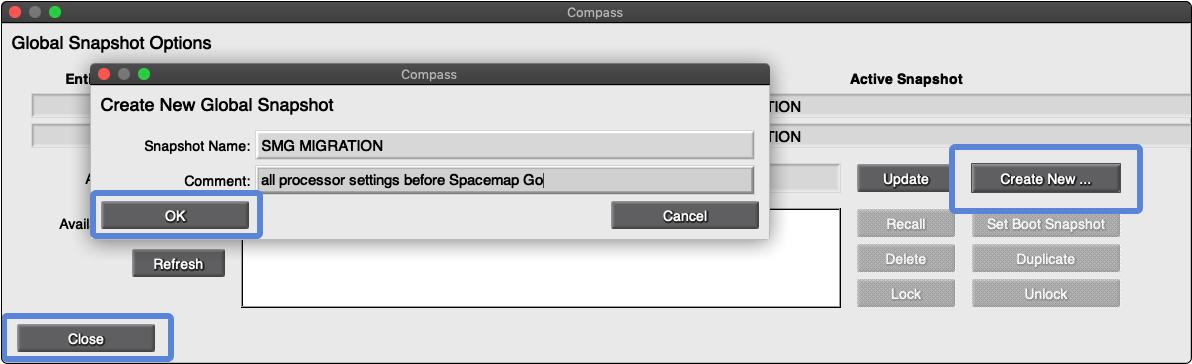
Compass Software – Global Snapshot Options, Create New, Enter Snapshot Name
Use Step 9: Click the Global Project SAVE AS button.
Use Step 10: Select a directory/folder and enter the file name: SMG MIGRATION; click SAVE.
NOTE: This step saves a Global Project on the computer as a backup

Compass Software – Save As Global Project
Use Step 11: Close the older version of Compass.
Use Step 12: Download, install, and launch the current version Compass software (version 4.8 or later).
Use Step 13: Click the PROCESSORS > INVENTORY tab.
NOTE: processors should be auto-discovered and listed. If not, click FIND DEVICES.
Use Step 14: Click CONNECT for each processor used in a Spacemap System, then YES for the firmware mismatch warning.

Compass Software – Inventory Tab, Click Connect and Acknowledge Firmware Mismatch
Use Step 15: Select the tab related to the first processor.
Use Step 16: Select the SETTINGS > NETWORK tab.
Use Step 17: Click the REBOOT WITH FACTORY DEFAULTS button.
Repeat Step 17 for each processor.
NOTE: The processor(s) will disconnect from Compass while rebooting (about 45 seconds) and then reconnect.
Compass Software – Network Tab, Reboot with Factory Defaults
Use Step 18: Enter an Entity Name—unique for each processor (e.g., SMG-1, SMG-2…).
Use Step 19: Enter a Group Name—use an identical name for all processors of a Spacemap System (e.g., show or venue name).
Repeat Step 18 and 19 for each processor.
NOTE: All processors require the same Group Name to be recognized as part of a Spacemap System.
NOTE: The Entity and Group Names cannot be changed after the processor is booted to Spacemap Mode.
NOTE: Multiple Spacemap Systems can be created by using a different Group Name for the processors of additional system(s).
Compass Software – Network Tab, Enter Entity Name (Unique) and Group Name (Identical for All Processors)
Use Step 20: Click the REBOOT ALL DEVICES (TO RECOVERY MODE) button.
NOTE: The processor will disconnect from Compass during the upload period (about 30 seconds) and then reconnect.
Compass Software – Reboot to Recovery Mode
Use Step 21: Click the UPLOAD FIRMWARE TO ALL GALAXY DEVICES button.
Compass Software – Upload Firmware to all GALAXY Devices
Use Step 22: Select the .galaxyFirmware file included with the Compass software. The firmware version will be newer than illustrated below.
Default Compass installation directories:
- MacOS: /Applications/Compass <current version>/
- Win: /Program Files (x86)/Meyer Sound/Compass <current version>/
Use Step 23: Click OPEN to start uploading the firmware.
NOTE: The processor(s) will disconnect from Compass during the upload/reboot (about three minutes) and then reconnect.
MacOS Finder – Compass Directory Files, GALAXY firmware file
Use Step 24: Click the REBOOT ALL DEVICES (TO SPACEMAP MODE) button.
NOTE: The processor(s) will disconnect from Compass while rebooting (about 30 seconds) and then reconnect.
Compass Software – Reboot All Devices to Spacemap Mode
Compass indicates that a processor is in Spacemap Mode by changing the color of the processor tab.
Compass Software – Tab Color Indicates Spacemap Mode
In-Use Processor Steps Completed. The configuration steps for the GALAXY processors are now complete.
Label Outputs
For each GALAXY processor, label the outputs. These names can also be entered and edited in the Spacemap Go app. Output names usually describe a loudspeaker model or location, e.g., “ULTRA-X40 Left” or “Main Left.” Input names are entered using the Spacemap Go app.
Recall Processor Settings
The Global Project saved during these steps is recalled after the initial System Configuration of the Spacemap Go app in the Quick Start. The Spacemap Go app manages the storage and recall of GALAXY processor settings after the initial Global Snapshot recall.
NOTE: Compass software and Compass Go are not used after the Global Snapshot is recalled.
IMPORTANT: Do not store or recall Snapshots with Compass software or Compass Go while operating a Spacemap System. The Spacemap Go app manages the storage and recall of GALAXY processor settings.
What’s Next?
Please visit the Quick Start page next.
For personal assistance, please visit: www.meyersound.com/contact, and select Technical Support and use the form to create a support case.
Configure Virtual Galileo GALAXY
If Galileo GALAXY hardware is not available, Compass can create virtual processors. All the functions of Spacemap Go are available without passing audio signals. Using virtual processors facilitates learning, testing, and programming off-line.
AVB Connection Management
AVB connections are not configurable while using Virtual GALAXY processors.
Entity and Group Names
Each AVB device has an Entity Name, a human readable identification of a specific AVB device. Use unique Entity Names for each GALAXY processor and all other AVB devices.
Each AVB device also has a Group Name, a human readable label that is used to group devices for control.
IMPORTANT: When a GALAXY processor is in Spacemap Mode, Spacemap Go manages the AVB connections of all GALAXY processors that have the same Group Name, even if some processors are in Normal Mode. Use a different Group Name for Normal Mode processors, allowing AVB connection management using Compass software. AVB connections for the Normal Mode processor are not possible until the Group Name is changed to one that does not include a processor in Spacemap Mode.
Follow the “Virtual Steps” below to use Compass 4.8 or later to start virtual Galileo GALAXY processors for use with Spacemap Go.
Virtual Step 1: Download, install, and launch Compass software, version 4.8 and later.
Virtual Step 2: Select the PROCESSORS > INVENTORY tab.
Virtual Step 3: Click the ADD PROCESSOR button.
Virtual Step 4: Select the processor model.
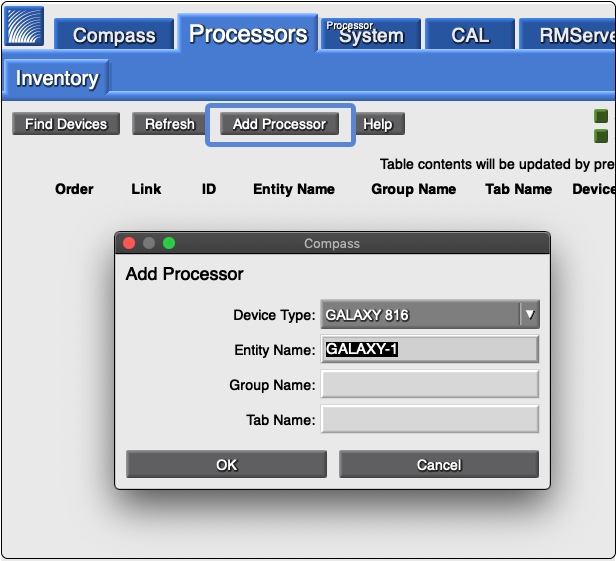
Compass Software – Inventory Tab – Add Processor
Virtual Step 5: Enter Entity Name—unique for each processor.
Virtual Step 6: Enter Group Name—use the same name for all processors of a system.
Repeat Steps 3-6 for each processor of the system.
NOTE: All processors require the same Group Name to be recognized as part of a Spacemap Go system.
NOTE: The Entity and Group Names cannot be changed after the processor is booted to Spacemap Mode in Step 10.
NOTE: Multiple Spacemap Go systems can be created by using a different Group Name for the processors of an additional system(s).
Virtual Step 7: Click the USE VIRTUAL button for each processor used in a Spacemap Go system.
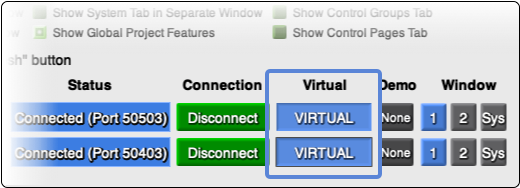
Compass Software – Virtual Processor
NOTE: For Windows operating systems, Allow Access in Windows Defender Firewall for virtual-core.exe.
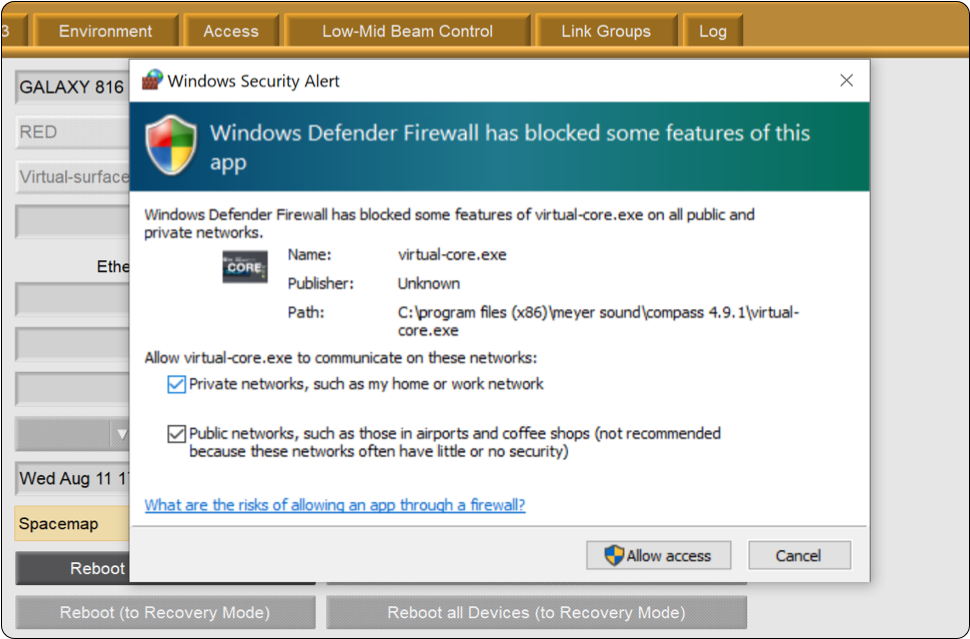
Windows Operating System, Allow Access in Windows Defender Firewall to Operate Virtual GALAXY Processors
Virtual Step 8: Click the tab related to the first processor (below, SMG-1).
Virtual Step 9: Click the SETTINGS > NETWORK tab.
Virtual Step 10: Click REBOOT ALL DEVICES (TO SPACEMAP MODE).
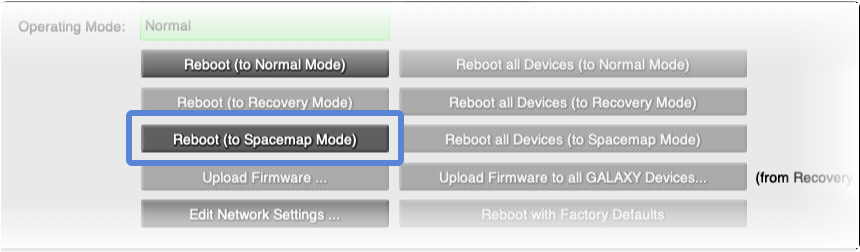
Compass Software – Reboot to Spacemap Mode
Compass indicates that a processor is in Spacemap Go Mode by changing the color of the processor tab.
Compass Software – Tab Color Indicates Spacemap Mode
Virtual Processor Steps Completed. The configuration steps for the Virtual GALAXY processor are now complete.
What’s Next?
Please visit the Quick Start page next.