Control Using OSCar
Spacemap Go Help
OSCar Plugin for Digital Audio Workstations
To automate the Spacemap Panner coordinates, Spread percentage, and the Spacemap A/B Crossfade, the OSCar plugin from IRCAM is used with a Digital Audio Workstation (DAW). The Oscar plugin is available in the following formats: AU, VST3, AAX for macOS, and VST3 for Windows. OSCar requires a 64-bit DAW application.
Universal Setup Instructions
NOTE: The Spacemap System must be operational before attempting the following steps.
Set IPv4 Addresses
Step 1: Set the following IPv4 addresses to the same class C range (e.g., 192.168.1.x, where x is between 1 and 255):
- The computer running the DAW,
- The OSCar External Device Connection window,
- The iPad running Spacemap Go,
- IPv4 address of OSCar External Device Connection in Spacemap Go (Spacemap Go > SETTINGS VIEW > EXTERNAL DEVICE CONNECTION > OSCar). This step also sets the IPv4 address of the GALAXY processor(s).
Spacemap Go – Enable OSCar
Step 2: Enable OSCar within the Spacemap Go App (Spacemap Go > SETTINGS VIEW > EXTERNAL DEVICE CONNECTION > OSCar).
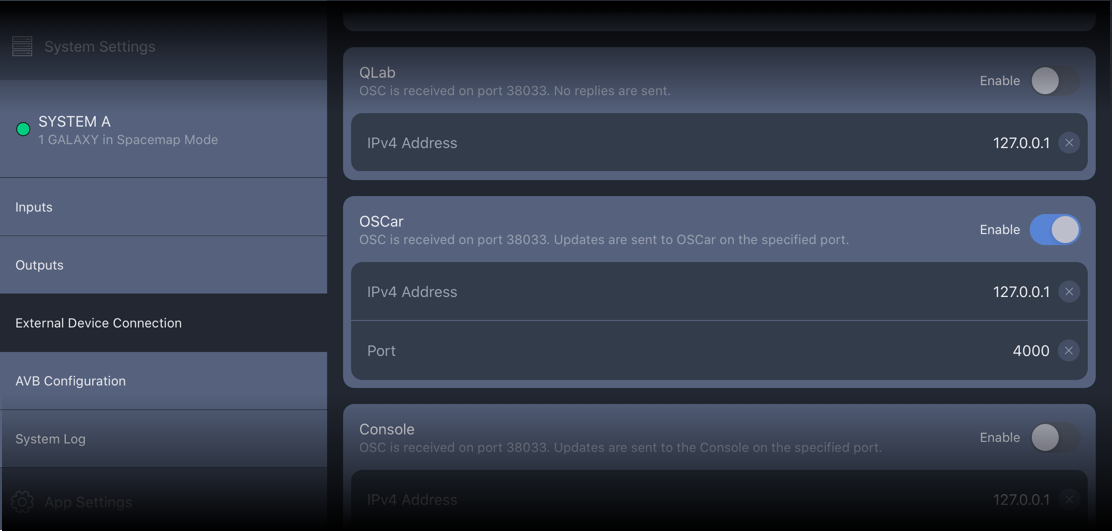
Spacemap Go – Settings View, External Device Connection, OSCar
Step 3: Add a Spacemap to the desired channel.
Step 4: Download the OSCar plugin.
Step 5: Unzip the folder and find the user manual in the main directory (Windows) or in the Documents folder (MacOS).
Step 6: Follow the instructions included with the download to install OSCar.
Step 7: Navigate to /Ircam/oscar/oscar.xml:
- macOS: /Users/username/Documents/Ircam/oscar/
- Windows: C:\Users\username\Documents\Ircam\oscar\
Step 8: Delete the default oscar.xml file in the Ircam/oscar directory.
Step 9: Download the Spacemap version of the oscar.xml file.
Step 10: Move the downloaded .zip file (oscar.zip) to the Ircam/oscar directory.
Step 11: Decompress the Spacemap oscar.zip file and delete the .zip file.
Step 12: Launch the DAW of your choice.
Step 13: Initialize the OSCar Plugin.
NOTE: If the DAW does not initialize the Oscar Plugin, confirm it is allowed within the plugin manager.
Step 14: Configure settings in OSCar:
- Plugin ID # = SpaceMap Go Channel Number
- Output IP = Spacemap Go OSCar External Device Connection IPv4 Address (default is 127.0.0.1; tap to edit), not the IP address of the iPad
- Output Port = 38033
- Input Port = 4000
Step 15: To verify the IPv4 connection, click the ping button in the OSCar plugin; the green circle should blink.
DAW – Configure OSCar Plugin
Step 16: Add an automation lane for a channel in the DAW and select a specific Spacemap control point:
- Channel Position X
- Channel Position Y
- Channel Crossfade
- Channel Spread
Step 17: Add automation to the automation lane.
NOTE: An instance of the OSCar plugin can be added to any channel. Each instance of the OSCar plug-in controls one channel.
Playback of the automation should move the control point(s) of the Spacemap System and be displayed in Spacemap Go for the selected channel.
These control points are bidirectional, also allowing automation lane values to be written in the DAW by changing the controls of a channel in Spacemap Go.
NOTE: Frequently, the first time some DAWs try to load OSCar, a re-scan of the plug-ins is required. Each DAW behaves differently.
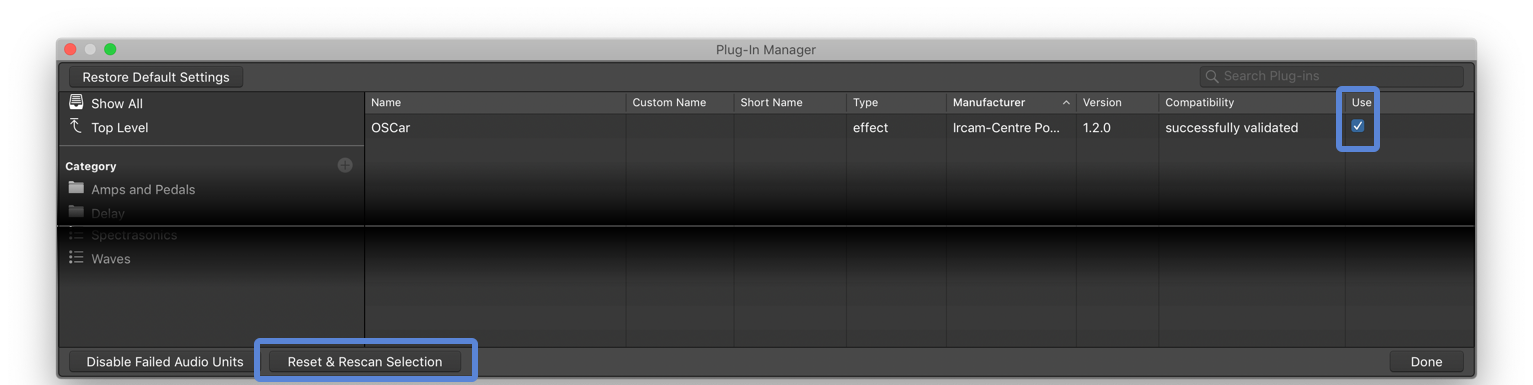
Logic Pro X – Plugin Manager, select Use and Reset & Rescan Selection
OSCar in Logic

Spacemap Go, Logic, OSCar – Bi-Directional Control
OSCar in Reaper
After the OSCar plugin is installed, open Reaper.
- Select Insert a New Track from the Track menu.
- On the channel, select the FX button to insert a plugin. In the pop-up, use the filter at the bottom to easily find the OSCar plugin. Select OSCar from the plugin list; click OK. When the FX window is opened, the OSCar plugin is listed.
- If the plugin is not listed, select REAPER > PREFERENCES. In the left column, scroll to PLUG-INS > VST, and click the RE-SCAN button in the right panel.
- Repeat steps 1 and 2 to add the plug-in to desired channels.
Click the ENVELOPE button on a channel to make display selections for the envelopes under the waveform of the audio track – X Locator, Y Locator, Spacemap Crossfades, and Spread envelopes. Select the automation mode to write the values sent from Spacemap Go or the automation mode to read the envelope values and send them to Spacemap Go.
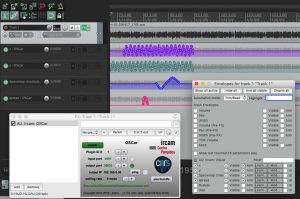
OSCar Plugin in Reaper
OSCar in Pro-Tools
In the OSCar folder is a video with instructions for using OSCar with Pro-Tools.