Avid VENUE Spacemap Go Plugin
Spacemap Go Help
Software and Firmware Requirements
This plugin requires the following software and firmware versions, or more recent releases:
Avid VENUE | S6L consoles running Version 7 software
Meyer Sound Compass version 4.9.2, which includes Meyer Sound GALAXY firmware version 2.4.2
Meyer Sound Spacemap Go version 1.2.0, available at the Apple App Store
Plugin Installation
Step 1: Download the plugin, unzip it, and copy the SpacemapControllerForVENUE.aaxplugin file to a USB drive.
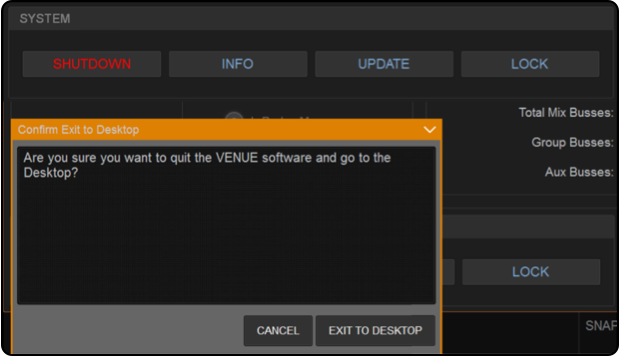
Avid Console – Exit to Desktop
Step 2: At the Avid VENUE console, click EXIT TO DESKTOP by holding down CTRL + the shutdown command.
Step 3: Connect the USB drive to the console and add the SpacemapControllerForVENUE.aaxplugin file to this directory:
C:\Program Files\Common Files\Avid\Audio\Plug-Ins
Step 4: Launch the VENUE 7.0 software. Click OPTIONS, then the PLUG-INS tabs.

Avid Console – Options Tab
Step 5: From the DEVICE drop-down, select CONSOLE from the drop-down menu.
Step 6: In the PLUG-INS TO INSTALL list, click to select SpacemapControllerForVENUE
Step 7: Click INSTALL.
When installed, the plugin will be listed in the INSTALLED PLUG-INS list (Result, below).
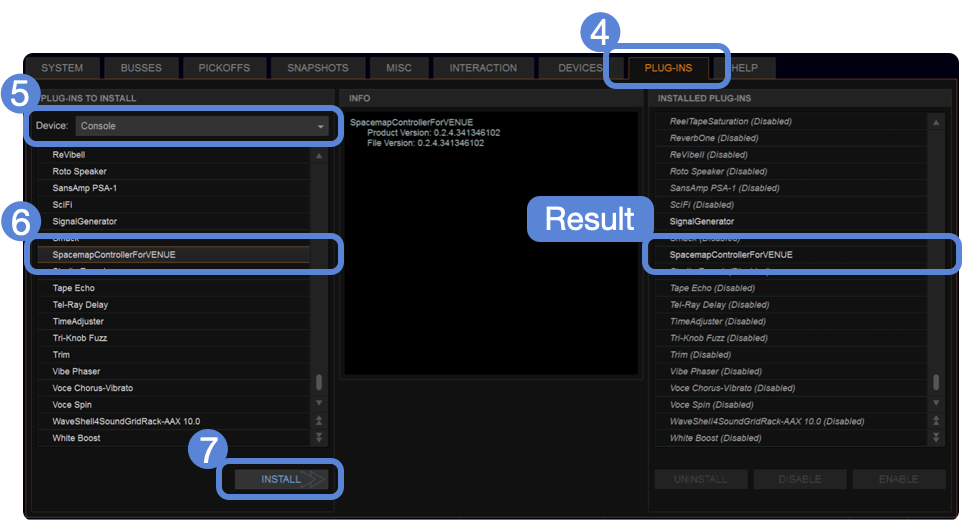
Avid Console – Options > Plug-Ins Tab, Select Device = Console, Select Spacemap Plugin, Click Install
Physical Connections
Connect the ECx NIC to the same Ethernet network as the GALAXY processors in Spacemap mode.
NOTE: Spacemap Go commands are sent from the console ECx Ethernet NIC. MILAN AVB streams are sent from the console via the installed MLN-192 card(s) NICs.
Load the Plugin to a Console Channel
The Spacemap plugin is loaded to a channel in the same way other plugins are.
STEP 1: Select the PLUG-INS tab.

Avid Console – Plug-Ins Tab
STEP 2: Select MONO or STEREO.
STEP 3: Select SOUND FIELD.
STEP 4: Select SPACEMAP GO PLUGIN.
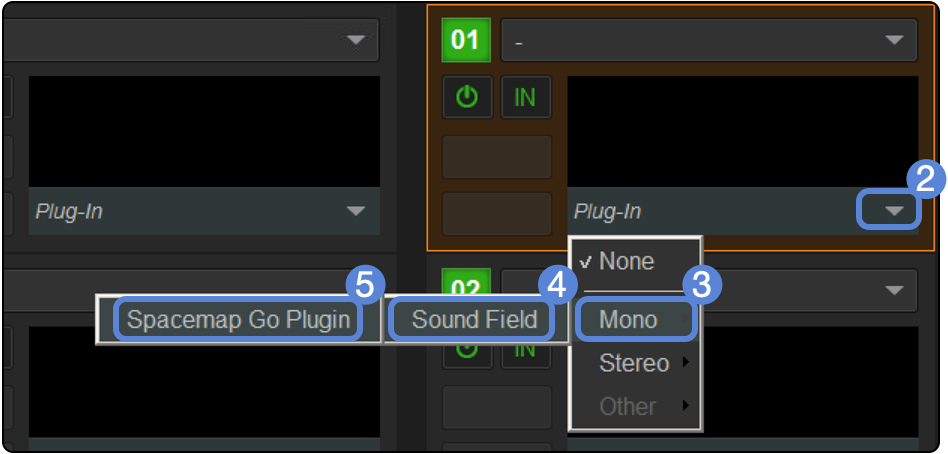
Avid Console – Plug-In Tab, Select Plugin
STEP 5: Select a console channel or output to assign this plugin instance to.
NOTE: This step does not make the audio connection to the Spacemap system. The audio of the channel must be delivered to the intended Spacemap system input and, using Spacemap Go, assigned to the proper Spacemap Go channel.
NOTE: The plugin can be assigned to any channel that can host a plugin (e.g., Input Channels, Groups, Aux Sends, etc.). The SELECT button of the channel will recall the plugin and populate the CKM module above the fader bank of the channel.
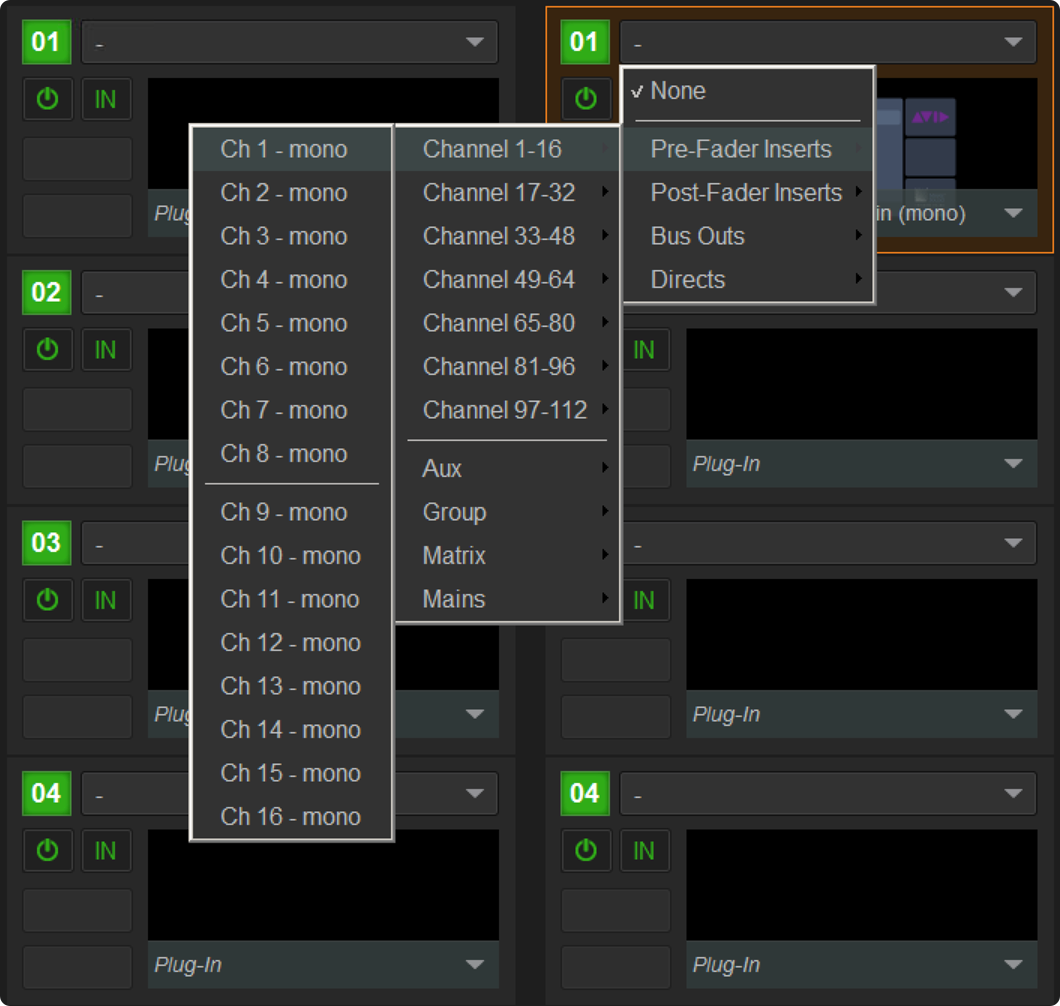
Avid Console – Plug-In Rack, Assign Plug-In to a Signal Path
STEP 6: Double-click the Plug-In Rack to open the plugin interface.
STEP 7: On the Connection page, select which Spacemap system to connect with the plugin.
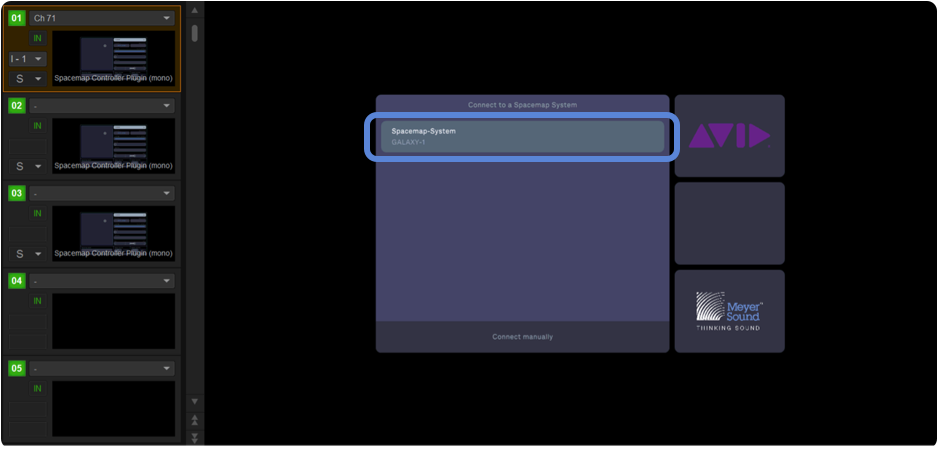
Plug-In Connection – Select Spacemap System, Click on System Name
Generally, it is not necessary to connect the plugin to the Spacemap system manually, but in case it is, click CONNECT MANUALLY at the bottom of the Connection page and enter the IPv4 address of the Spacemap system. By default, the Spacemap system uses IPv6 addressing, but the system can be assigned an IPv4 address in the Spacemap Go app by navigating to SETTINGS VIEW > EXTERNAL DEVICE CONNECTION > SPACEMAP SYSTEM IP CONFIGURATION and entering an IPv4 address in the same subnet as the VENUE console. See this FAQ for additional Spacemap system GALAXY processor IPv4 addressing information.
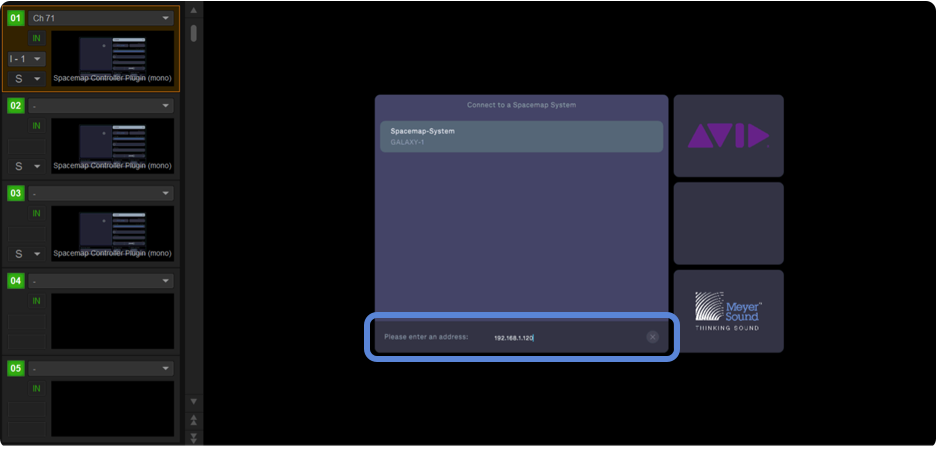
Plug-In Connection – Enter the IPv4 Address of a Spacemap System Address
STEP 8: Select the Spacemap Channel for the plugin to control by clicking the Channel button in the upper-right of the plugin and select a channel from the drop-down menu.
NOTE: The Channel selection enables control of the parameters of the selected Spacemap Channel, the Spacemap System Mix Level, and System, Mix and Channel Snapshot recalls.
NOTE: Selecting NONE for the Channel selection limits the instance of the plugin to control only the Spacemap System Mix Level and recall of Spacemap Go Snapshots. This can help separate global controls and channel controls at the console.
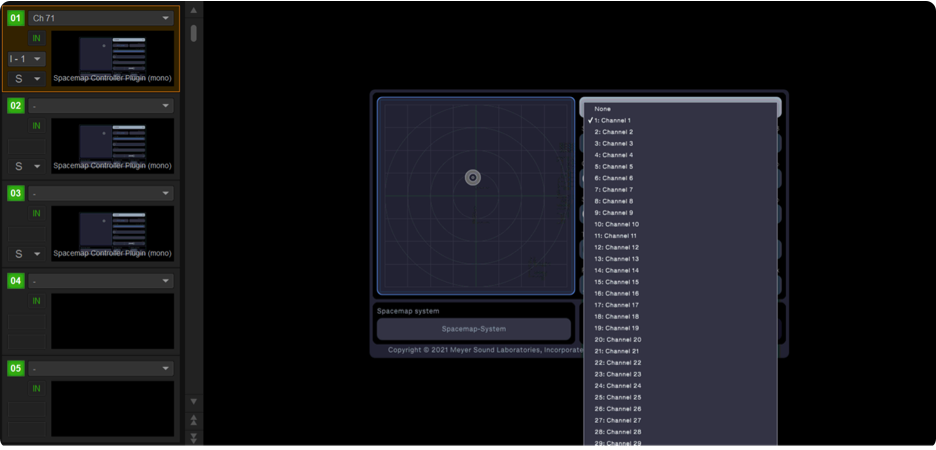
Plug-In Connection – Select the Spacemap Channel to Control with the Plug-In
Plugin Controls
These controls can be modified on screen, and are visible in the CKM channel when the console channel is selected:
- X-Y Position
- Crossfade between Spacemaps of a Spacemap Channel
- Spread
- Trajectory Start, Pause and Stop
- Trajectory Rate
Spacemaps are not displayed in the plugin. The Spacemap and Trajectory names are read only in the plugin.
Use the Spacemap Go app to select different Spacemaps or Trajectories or use the plugin to recall Spacemap Snapshots that have different Spacemaps or Trajectories assigned to a Spacemap Channel. The Spacemap Snapshots can then be recalled using the plugin.
All controls can be modified on the screen by click-dragging the controls available in the plugin, e.g., the Spacemap Panner, Crossfade and Spread sliders, Trajectory buttons, and Rate slider.
Use the Spacemap Go app to change/edit all names displayed in the plugin.
The Setlist and System Controls at the bottom of the plugin are described in the Snapshot Control section below.
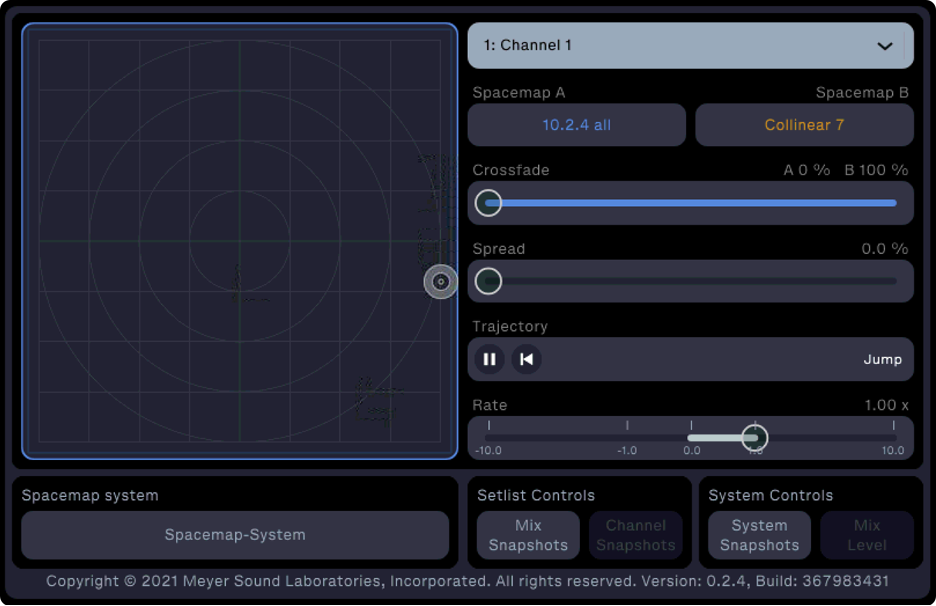
Spacemap Plugin Available Controls
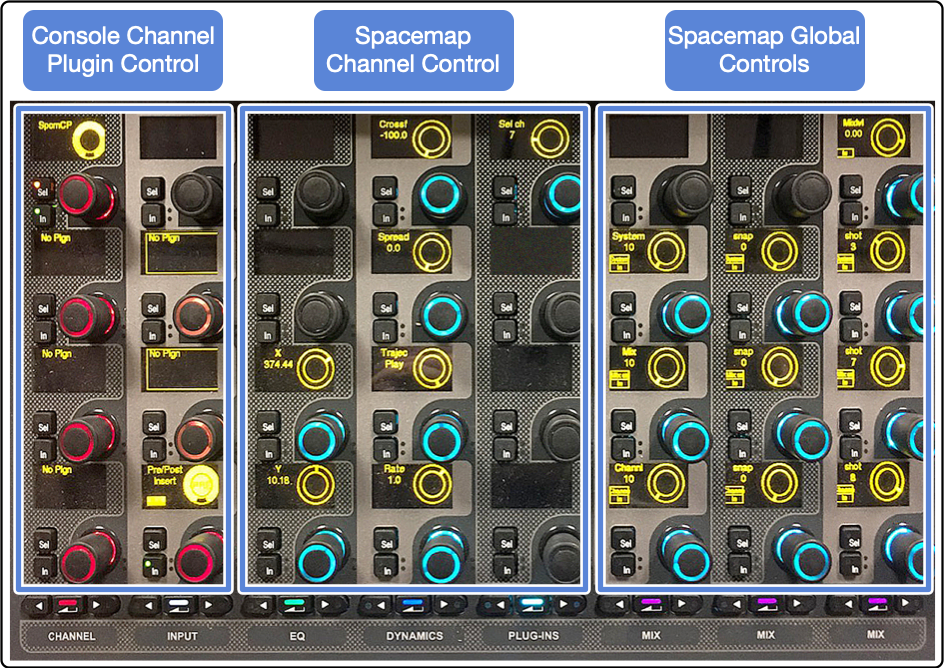
CKM Controls
The CKM module displays the plugin controls for the selected channel of the console.
The first two columns (Console Channel Plugin Control, below) relate to the console channel plugin rack.
The next three columns (Spacemap Channel Control, below) control the plugin of the selected console channel.
The last three columns (Spacemap Global Controls, below) control global Spacemap Go functions: Mix Level and Snapshot recall.
These controls are the same as those displayed in the plugin. The settings are displayed in the OLED screen and are controlled by the corresponding rotary knob. Depressing the rotary knob has no function.
Mix Level controls the output level of the entire Spacemap system. The other global Spacemap functions are explained in the Snapshot Recall section below.
CKM Spacemap Plugin Controls
Snapshot Recall
Spacemap Snapshot External ID Value
In Spacemap Go, the External Recall ID numbers for each Snapshot are displayed in the Setlist view by tapping the ![]() icon next to each Snapshot.
icon next to each Snapshot.
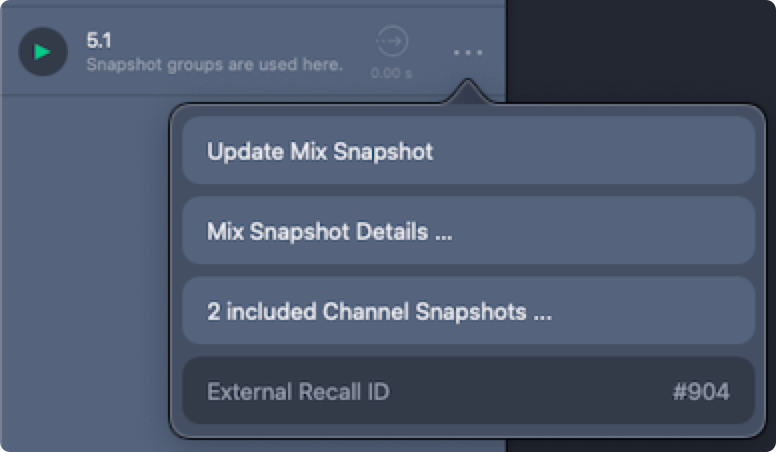
Spacemap Go App, Setlist View – Details of Snapshot, Including External Recall ID Number
Enable Setlist and System Controls
For Snapshot recall, two options are available: manually using the CKM module controls or storing the state of the plugin with a console snapshot. Both require the Setlist and System Controls for the instance of the plugin to be enabled in the plugin interface.
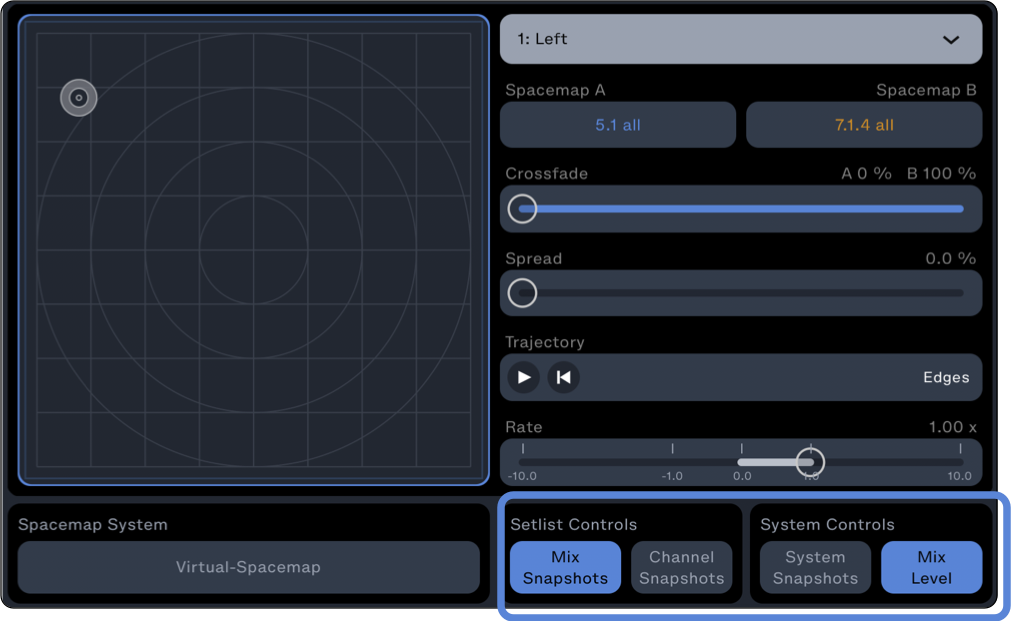
Spacemap Go Plugin – Setlist Controls, Mix Snapshots Enabled and System Controls, Mix Level Enabled
Manual Recall
The CKM module displays the active Snapshot Recall ID number in each of the last three rows of the last three columns of the module. The Mix Snapshot is highlighted below.
Due to the resolution of the encoders, the Recall ID value has been split into the three columns: hundreds, tens, and ones. For example, to recall Snapshot #1248, set the encoders to 12, 4, and 8.
STEP 1: To change a value, press the IN button next to the rotary knob.
STEP 2: Use the rotary knob to change the value(s).
STEP 3: Within 5 seconds, press the SEL button next to the rotary encoder to send the updated value to the Spacemap system.
The SEL and IN button LEDs will turn off and the updated value will be displayed.
NOTE: When a value is changed using the rotary knob, the SEL button times out after 5 seconds and the current value is displayed. If SEL is not pressed within 5 seconds, the value will revert to the current Spacemap value.
In the left image below, the IN button has been pushed and the rotary knob is used to change values to be sent to the Spacemap system.
In the right image below, the SEL button is also illuminated and Mix Snapshot #1005 is ready to be recalled. When the SEL button is pressed within 5 seconds, the command to recall Mix Snapshot #1005 is sent to the Spacemap system.
NOTE: Remember that a Mix snapshot should always be recalled before a Channel Snapshot. System snapshots can be recalled at any time.
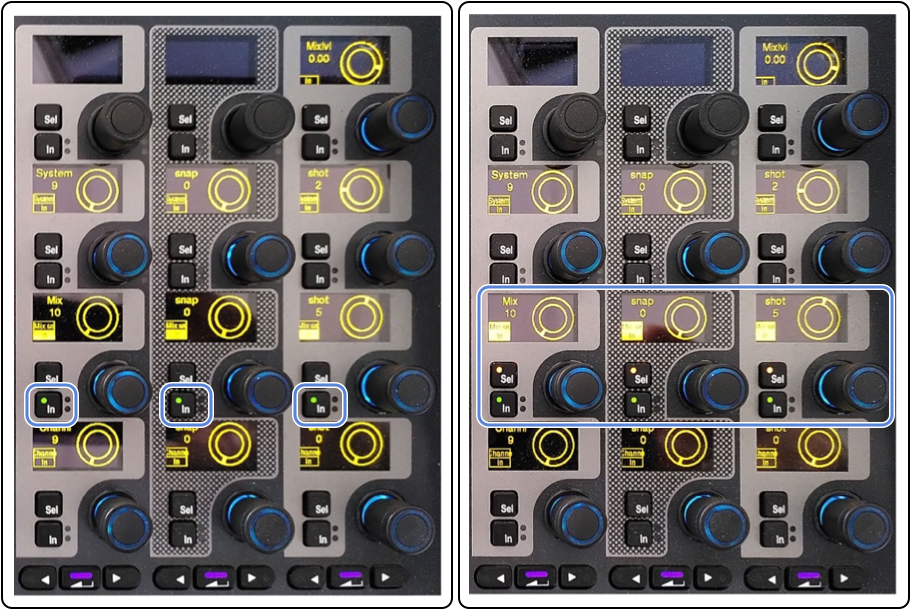
Console CKM Display – Global Spacemap Controls Section, Snapshot ID #1005 Ready for Recall
Automation Recall
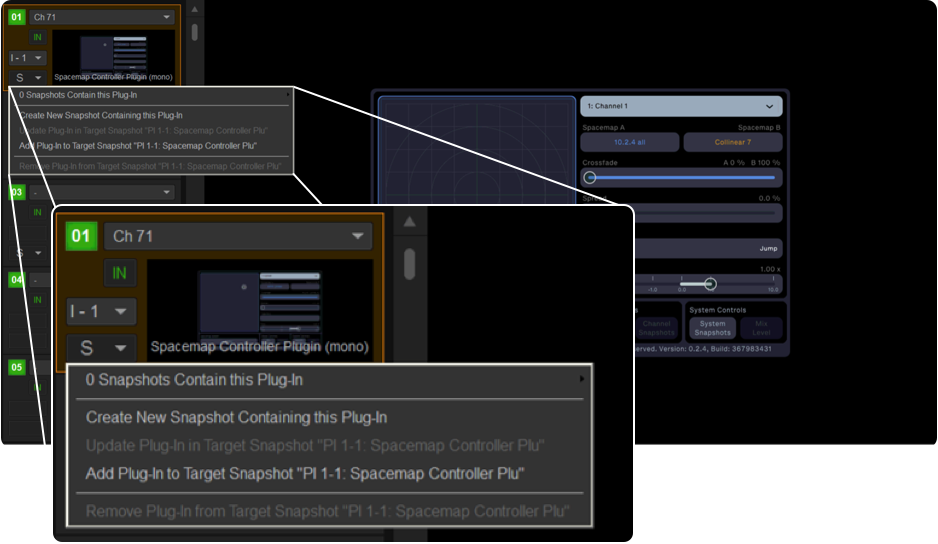
The plugin state needs to be stored with the Console Snapshot. To do this, go to the instance of the plugin that will control the Snapshot recall and either:
- Create a new console Snapshot, including the Spacemap Plugin, or
- UPDATE or ADD the plugin to a Target Snapshot < console_snapshot_name here >
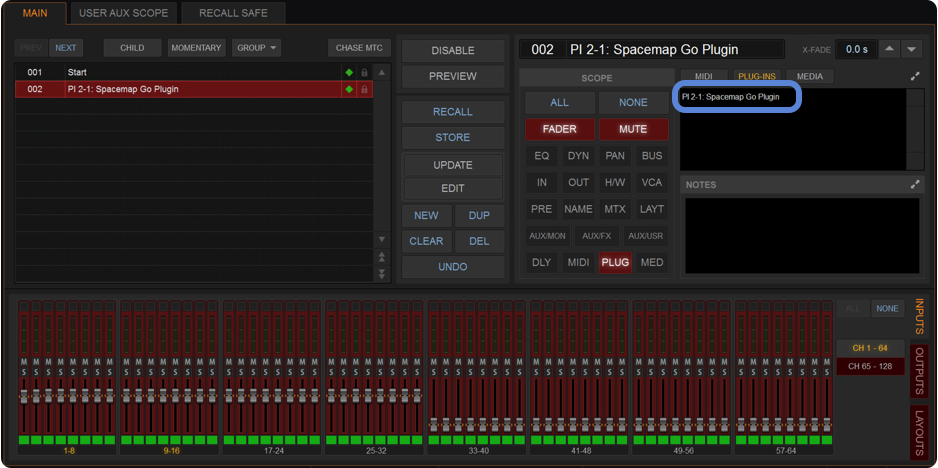
Avid Console – Create Console Snapshot Including Spacemap Plugin
Plugin control can be integrated with the Console Snapshot recalls. At this time, the plugin stores the current Spacemap Snapshot Recall ID number displayed on the CKM. It is not affected by manual control.
The plugin controls at the bottom must be enabled to trigger Snapshots. The state of these controls is also stored with a Console Snapshot.
When stored with a Console Snapshot, the plugin state includes:
- The state of the Global controls (if recall is enabled or not).
- The current Spacemap System Snapshot.
Avid Console – Console Snapshot Including Spacemap Plugin State
Recommended Workflow
- Assign instances of the plugin to console inputs or outputs for control of associated Spacemap Channels. For these instances, disable the Setlist and System Controls.
- Assign one instance of the plugin to an otherwise unused console channel, expressly for the purpose of making manual or automated changes to the Global Spacemap controls, Mix Level and Snapshot recalls. This strategy minimizes the likelihood of multiple instances of the plugin making changes to Global Spacemap controls.
NOTE: The plugin can be assigned to a Console Channel, using NONE as the selected Spacemap Channel, enabling only Mix Level and Spacemap Snapshot recall controls.
- In the Spacemap Go app, after Spacemap Snapshots are created and the Setlist is established, recall the first Snapshot.
- From the Plug-In tab of the Console, choose the instance of the plugin that will control Snapshots.
- Create a new Console Snapshot from the Plug-In Rack using the S drop-down menu in the bottom-left corner, see above.
- In the Spacemap Go app, recall the next Snapshot from the Setlist view.
- Create a new Console Snapshot from the Plug-In Rack using the S drop-down menu in the bottom-left corner, see above.
- Repeat for additional Spacemap Snapshot recalls.