SSL Spacemap Go Plugin
Spacemap Go Help
Introduction
Meyer Sound Laboratories, Incorporated and SSL have worked in partnership to provide integrated control of a Spacemap Go immersive loudspeaker system from the console interface. Spacemap Channels can be associated with console Channels or Stems, with full control of Spacemap Panner, Crossfade, Spread and Trajectory transport controls available from the console for each Spacemap Channel.
Software and Firmware Requirements
This feature is available when using the following software and firmware versions, or more recent releases:
SSL Live console software version 5.0
Meyer Sound Compass version 4.9.2, which includes Meyer Sound GALAXY firmware version 2.4.2
Meyer Sound Spacemap Go version 1.2.0, available at the Apple App Store
Configure Spacemap Go App
STEP 1: Using the Spacemap Go app, navigate to the SETTINGS VIEW. In the left pane, select EXTERNAL DEVICE CONNECTION. In the right pane, in the SPACEMAP SYSTEM IP CONFIGURATION fields (top of pane), enter an IPv4 address for the Spacemap system and a Subnet Mask to establish a communication path to/from the SSL console (e.g., IPv4 address 192.168.1.10, subnet mask 255.255.255.0). See this FAQ for additional Spacemap system GALAXY processor IPv4 addressing information.

Spacemap Go App – Settings View, External Device Connection, Spacemap System
STEP 2: In the same pane (EXTERNAL DEVICE CONNECTION), scroll down to CONSOLE, tap ENABLE, and enter the console’s IPv4 address in the EXTERNAL DEVICE (CLIENT) IPv4 ADDRESS field.
NOTE: The IPv4 address of the console is displayed and changed in the console’s Network Options (MENU > SETUP > NETWORK).
NOTE: Each IPv4 address on the network must be unique, but in the same subnet for successful communication between devices (e.g., 192.168.1.100, 192.168.1.110, using the subnet mask 255.255.255.0)
STEP 4: In the EXTERNAL DEVICE (CLIENT) RECEIVING PORT field, enter the port number for the Spacemap system to receive communication from the SSL console. The suggested port number is 4001.

Spacemap Go App – Settings View, External Device Connection, Console
Configure Console
STEP 1: Navigate to the SSL console’s EXTERNAL CONTROL options tab (MENU > SETUP > OPTIONS). In the OSC SETTINGS panel, select SPACEMAP GO in the device list to open the DEVICE CONFIGURATION panel.
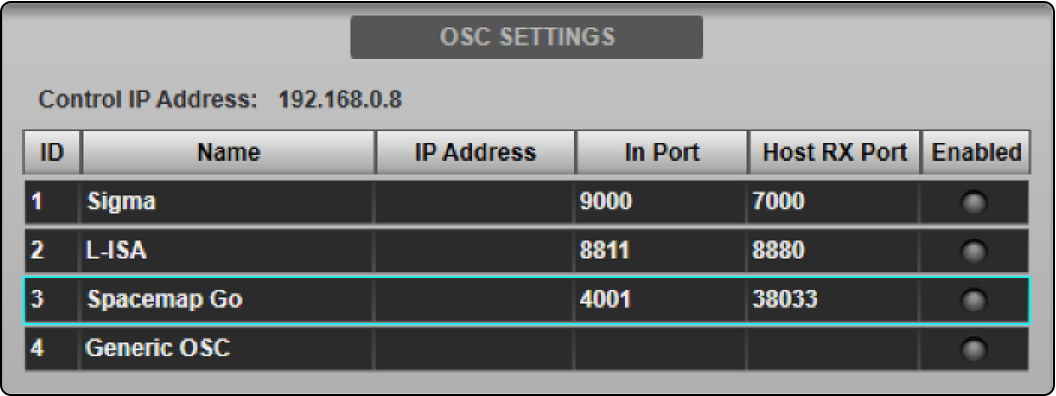
SSL Console – External Control Options, OSC
STEP 2: In the DEVICE CONFIGURATION panel, HOST IP ADDRESS field, enter the IPv4 address of the computer running Compass software.
NOTE: This IPv4 address is stored in the console’s Showfile.
NOTE: Each IPv4 address on the network must be unique.
STEP 3: In the INCOMING PORT field, enter the same port number entered in the Spacemap Go app, EXTERNAL DEVICE (CLIENT) RECEIVING PORT.
NOTE: The NAME and HOST RX fields displayed are read-only.

SSL Console – Device Configuration Panel
STEP 4: In the OSC SETTINGS window, tap ENABLE CONTROL to enable control of Spacemap Go from the console.
The ENABLED indicator in the OSC SETTINGS panel for Spacemap Go will turn green. Multiple devices can be enabled simultaneously.
NOTE: The console’s IPv4 address is displayed for reference and must be in the same subnet as, but not identical to, the IPv4 addresses of the devices running Compass and the Spacemap Go app. These addresses can be changed in the NETWORK options tab (MENU > SETUP > NETWORK OPTIONS tab; see Network Options for more details.
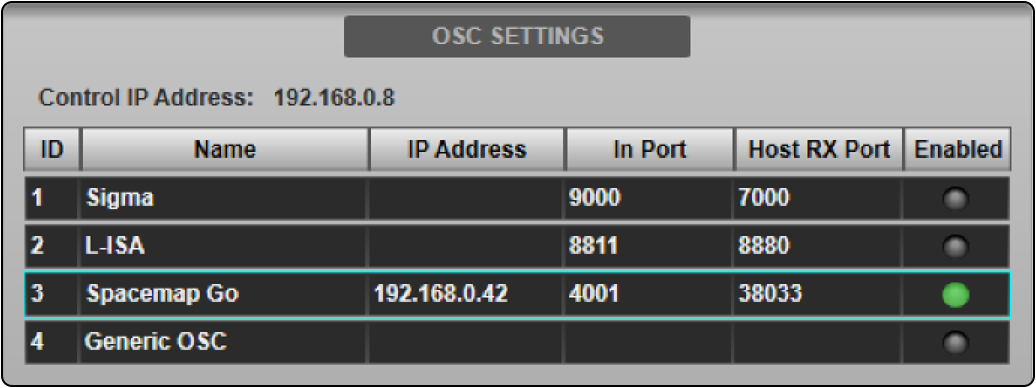
SSL Console – OSC Settings Panel, Spacemap Go Enabled
Path Assignment
Control of a Spacemap Go Channel can be enabled on any of the console’s Channel or Stem paths, except Dry Channels and Dry Stems.
STEP 5: Navigate to the EXTERNAL CONTROL, Detail View page and select Spacemap Go from the SELECTED DEVICE menu.
Path Link can be used to assign and enable Spacemap Go control to multiple paths simultaneously. The selected External Control device will be stored in the console’s Showfile.
Audio Routing
STEP 6: Ensure the console and GALAXY Processor sample rates are compatible. Set the console output sample rate to either 96 kHz (recommended) or 48 kHz. If the console output is 48 kHz, engage the AES ASCR (asynchronous sample-rate converter) option for the input(s) in Compass software ({processor name} > SETTINGS > INPUT AND OUTPUT). If the console output is set to 96 kHz, ASCR’s are not needed, but won’t have an adverse effect. The internal sample rate of GALAXY processors is 96 kHz. Also, refer to Clocking & Sync for details.
GALAXY Processors support analog, AES3 and AVB inputs. Route the console’s Channel/Stem outputs to the required ports for connection to the Meyer Sound GALAXY processor. Please refer to the Routing section for further information.
NOTE: The recommended routing is to use the Channel/Stem direct outputs as inputs to the Spacemap system. Set the outputs to POST ALL processing. Please see System Options for further details.
Available Controls
When the Spacemap Go plug-in is enabled on a Channel or Stem, the path’s EXTERNAL CONTROL DETAIL VIEW presents the Spacemap Go control interface. This provides control of the following parameters for the associated Spacemap Go Channel:
- X/Y of Spacemap Panner
- Crossfade
- Spread
- Trajectory Rate
- Trajectory Transport Controls
A 2D panning interface is provided for touch control of the X/Y position of the Spacemap Panner for the assigned Spacemap Channel.
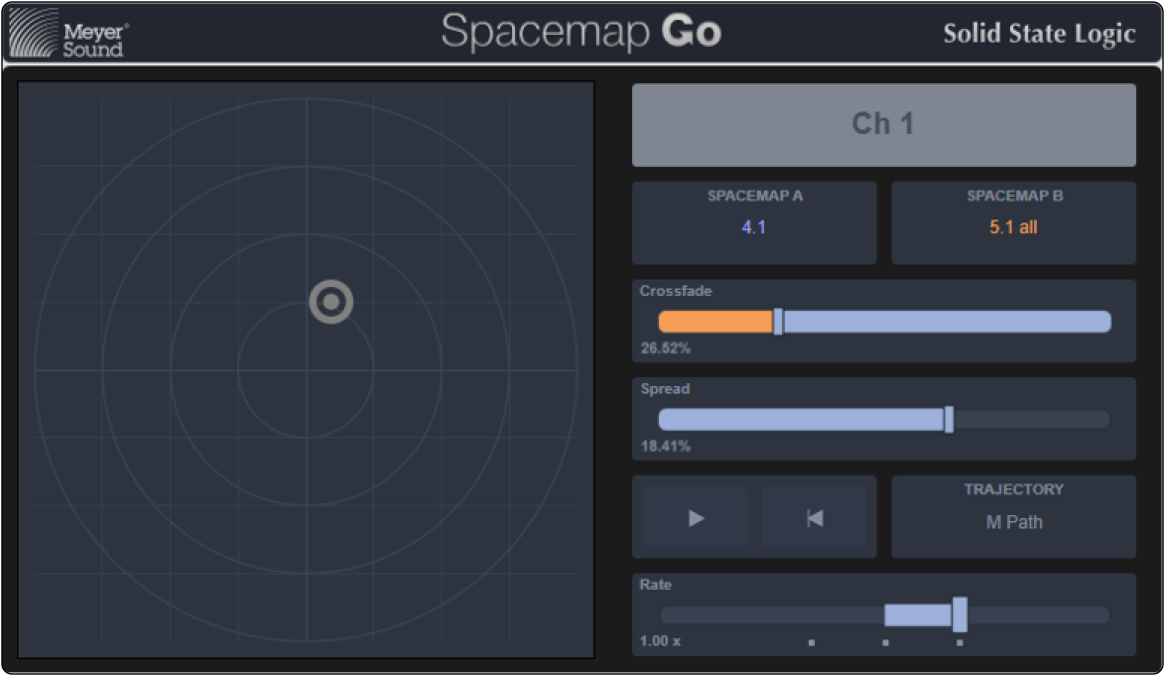
SSL Console – Spacemap Go Plug-In
The Spacemap Go iPad app takes control precedence. The console plug-in controls will be temporarily disabled while parameters are adjusted in the Spacemap Go app.
IMPORTANT: It is recommended by SSL and Meyer Sound that console automation of EXTERNAL CONTROL parameters is disabled for paths using Spacemap Go. Instead, automate the Spacemap Go parameters using Mix and Channel Snapshots in the Spacemap Go app. Spacemap Go Snapshots include optional wait and transition times.
However, Spacemap Go parameters can be automated in the same way as other path parameters; use the EXTERNAL CONTROL column in the Automation Filters page to adjust the store and recall scope.
All of the Channel’s/Stem’s regular processing and bus controls remain available and function as normal.
Configuring Spacemap Go Master Level Control
STEP 1: Create one OSC Path for the Spacemap Go Mix Level control using the Console Configuration page (MENU > SETUP > CONSOLE CONFIGURATION). Refer to the Console Configuration information for further details about using this page.
STEP 2: Place the OSC Path on the console surface using the Layer Manager to assign it to a Fader Tile layer/bank. OSC Paths may also be assigned to the console’s Master Tile FOCUS and MAIN faders. Refer to the Master Tile section for further instructions.
STEP 3: Navigate to the OSC Path in the Channel View and double-tap the Eyeconix area at the bottom of the screen to open the Name/Eyeconix Detail View page.
STEP 4: Name and select a color for the OSC Path as desired (e.g., SMG Master).
STEP 5: Navigate to the EXTERNAL CONTROL DETAIL VIEW page and select Spacemap Go from the SELECT DEVICE menu. The OSC Path’s fader will synchronize to the Spacemap Go Mix Master level position and can now be used to adjust it.
CAUTION: Care should be taken if automating the fader position as it can cause large changes in level. Like other path types, the OSC Path’s fader position can be stored in console automation, but as with the per-path Spacemap Go controls described above, it is recommended that External Control parameters are disabled in console automation.
Automating Spacemap Go Parameters
In order to prevent possible data conflicts, Spacemap Go parameters should be stored in only one automation system, either in Spacemap Go (recommended) or in the console. To disable recall from the console’s automation system, navigate to the AUTOMATION page (MENU > AUTOMATION) and select the GLOBAL RECALL FILTERS page. Refer to the Automation Filters section for details.
Navigate to the paths that have Spacemap Go control enabled and ensure the External Control column is turned off for these paths.
NOTE: This will only disable recall of the External Control parameters. To disable storing these parameters, turn off the External Control column in the Global Store Filters page as well.
Using a Generic OSC Path to Trigger Spacemap Go Snapshots
To trigger Spacemap Go Snapshots in sync with firing console scenes, a Generic OSC device assigned to an OSC path can be used.
STEP 1: Configure the Generic OSC device with the same IP address and port numbers as the Spacemap Go plug-in configured above.
STEP 2: Configure one of the Generic OSC Faders with an OSC Address of /Console/recall/system.
NOTE: Spacemap Go Snapshots are automatically assigned an External Recall ID number between 900 and 3000. Set the Fader’s Min and Max fields to cover the number of snapshots required. Keep in mind the Fader is represented in percentage, so a range (Min and Max) of 900 to 1000 would mean that a 1 % change in Fader position equates to increasing the External Recall ID by 1 (starting at 900). For example, a Fader value of 42 % would equal Snapshot #942 (900+42).
NOTE: Generic OSC Fader 1 is mapped to the physical fader when assigned to an OSC Path. Therefore, it is recommended that another fader number is used, so as to prevent accidental physical fader moves causing a snapshot change.
STEP 3: Create a new OSC Path in the Console Configuration page (MENU > SETUP > CONSOLE CONFIGURATION). Refer to the Console Configuration section for further details about this page.
STEP 4: Ensure that the OSC Path’s External Control parameters are set to STORE and RECALL in the console’s automation scenes. Refer to the Automation Filters section for details.
STEP 5: Place the new OSC Path on the console surface for ease of access using the Layer Manager or use the LAYERS button in the Channel View sidebar to gain access.
STEP 6: Navigate to the OSC Path in the Channel View and double-tap the Eyeconix area at the bottom of the screen to open the Name/Eyeconix Detail View page. Name/color the OSC Path as desired, e.g., SMG Snapshot.
STEP 7: Navigate to the EXTERNAL CONTROL DETAIL VIEW page and select GENERIC OSC from the SELECT DEVICE menu.
In each console scene you wish to recall a Spacemap Go snapshot, change the OSC Fader position to match the required Spacemap Go External Recall ID number, keeping in mind the offset and range (Min and Max) of values entered above. Remember to store this value in the console’s automation system so it is recalled when the scene is fired.
TIP: Tap on the OSC Fader to select it, then double-tap in the text field in the lower right corner of the DETAIL VIEW to envoke a keyboard to enter a specific value. Refer to the Detail View section for further details.
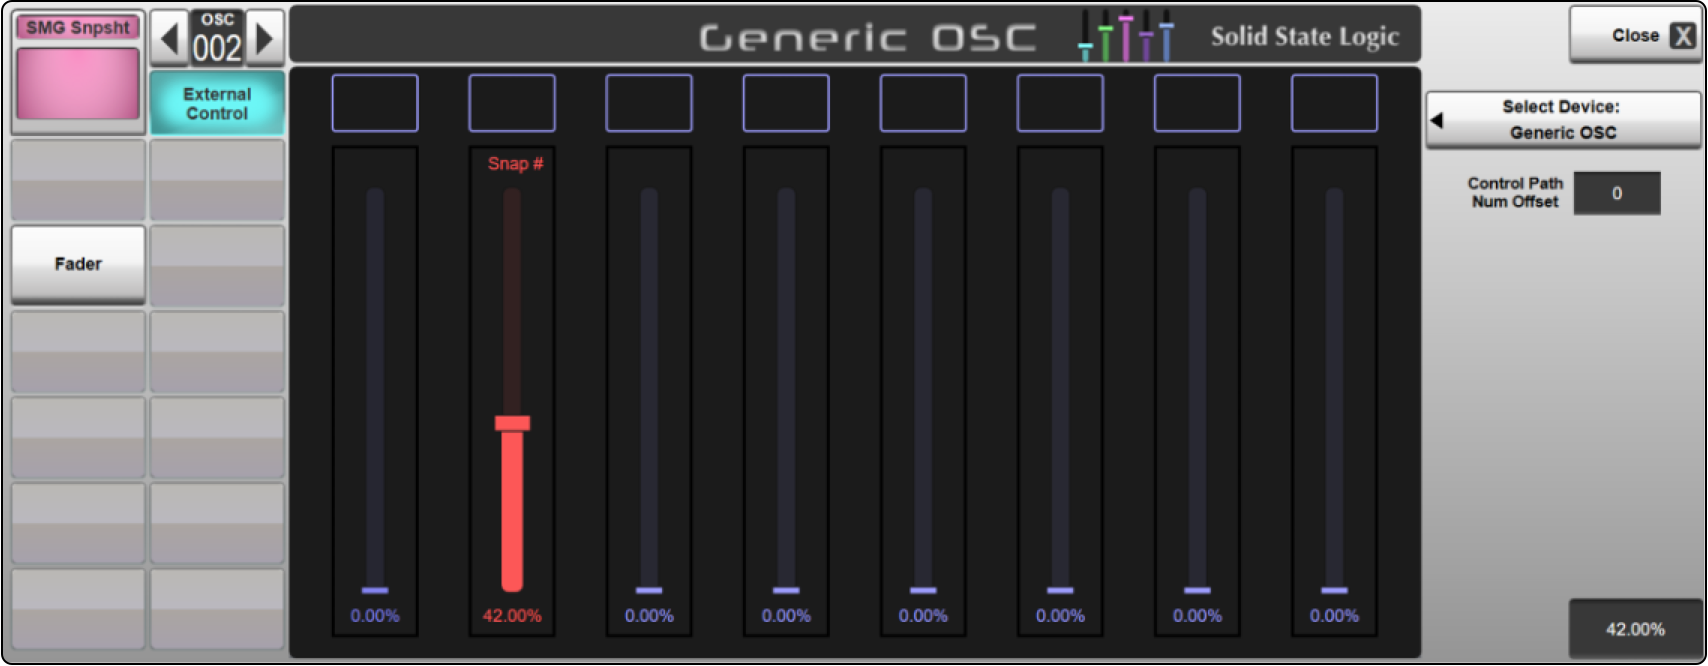
SSL Console – OSC Fader Set to Recall a Spacemap Go Snapshot
Now, when a scene is fired that contains a new value for the OSC Fader in the Generic OSC Path, an OSC message is sent to Spacemap Go prompting a snapshot change to coincide with the console automation scene change.