Quick Start
Spacemap Go Help
The steps listed below assume that the audio and network connection instructions and one of the Galileo GALAXY processor configuration methods have been successfully completed.
These steps guide users to quickly configure the Spacemap Go system and pass audio. See the Interface and Spacemap menus above for more detailed information.
Configure System Inputs and Outputs
These steps use the Spacemap Go app to define the inputs and outputs of a Spacemap Go system.
The example Spacemap Go system below includes:
- Inputs: 2 analog, 2 AES3, and 28 Milan AVB channels from an AVB source
- Outputs: 16 analog channels
- Processors: one GALAXY 816
- Network switch: one Milan AVB, Avnu Alliance certified network switch with the AVB license pack installed and configured
Example System Configuration
NOTE: Ensure the GALAXY processors are booted to Spacemap Mode and the Group Names of each processor are identical.
Step 1: Power off or disconnect loudspeakers from the GALAXY processor.
CAUTION: This step avoids any possibility of inadvertently reproducing very loud sounds. After the system is configured, the loudspeakers are powered on or reconnected.
Step 2: Connect the iPad to a Wi-Fi network connected to the Internet.
Step 3: Install the Spacemap Go app on an iPad. The app is available at no cost from the Apple App Store.
Step 4: Connect the iPad to the Spacemap Go Wi-Fi network.
Step 5: Launch the Spacemap Go app.
NOTE: When Spacemap Go launches, the Group Name assigned to all of the processors is displayed as an available Spacemap System.
Step 6: Tap a Spacemap Go System Name.
For this example: tap SYSTEM A
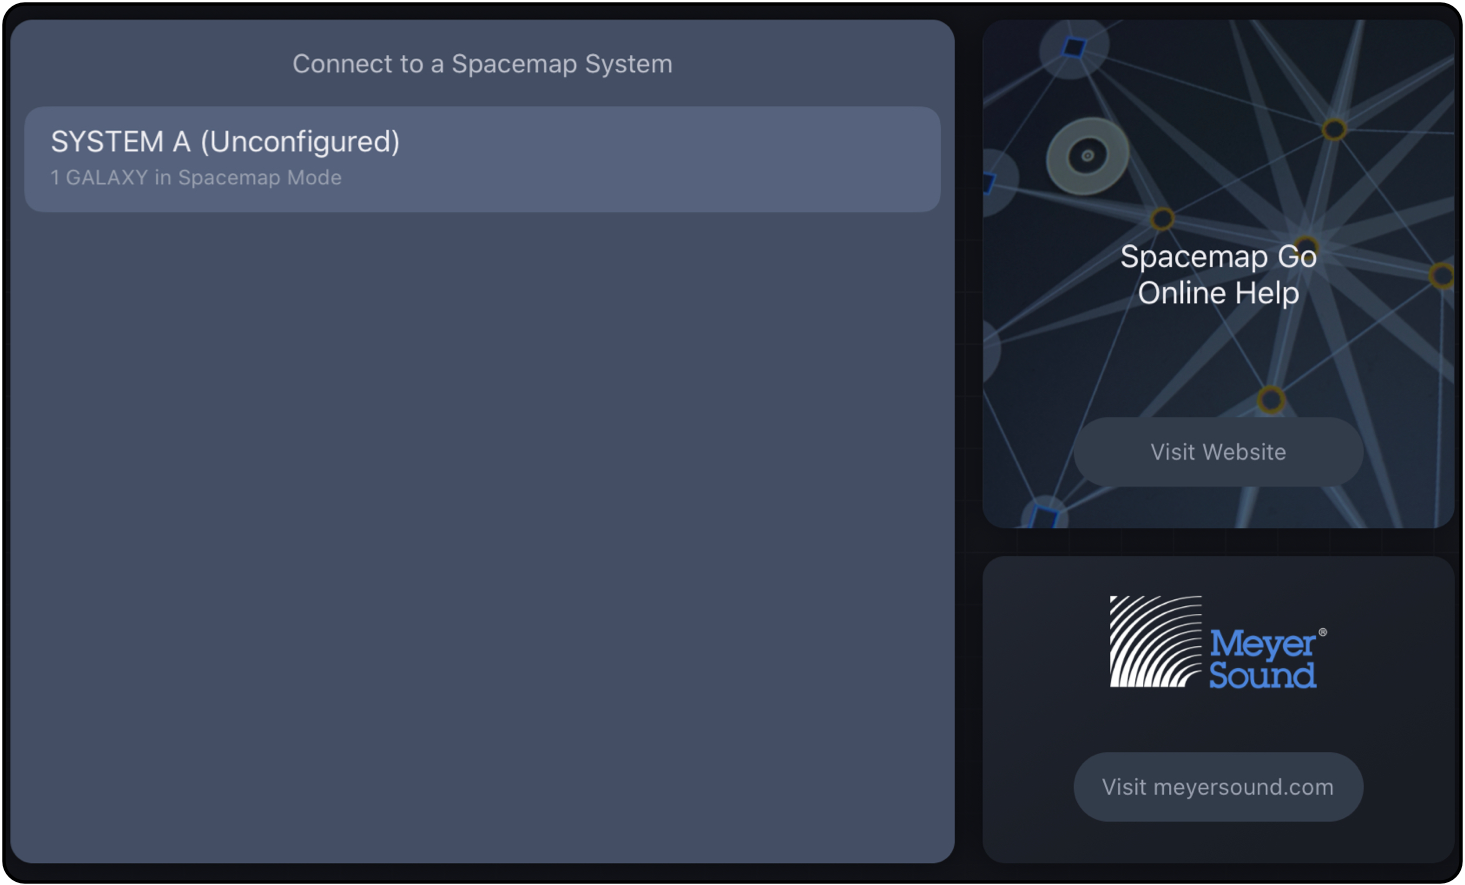
Connection Wizard – Tap a Spacemap System to Connect
Step 7: If a system has no physical audio inputs (AVB only), tap PROCEED and go to Step 10.
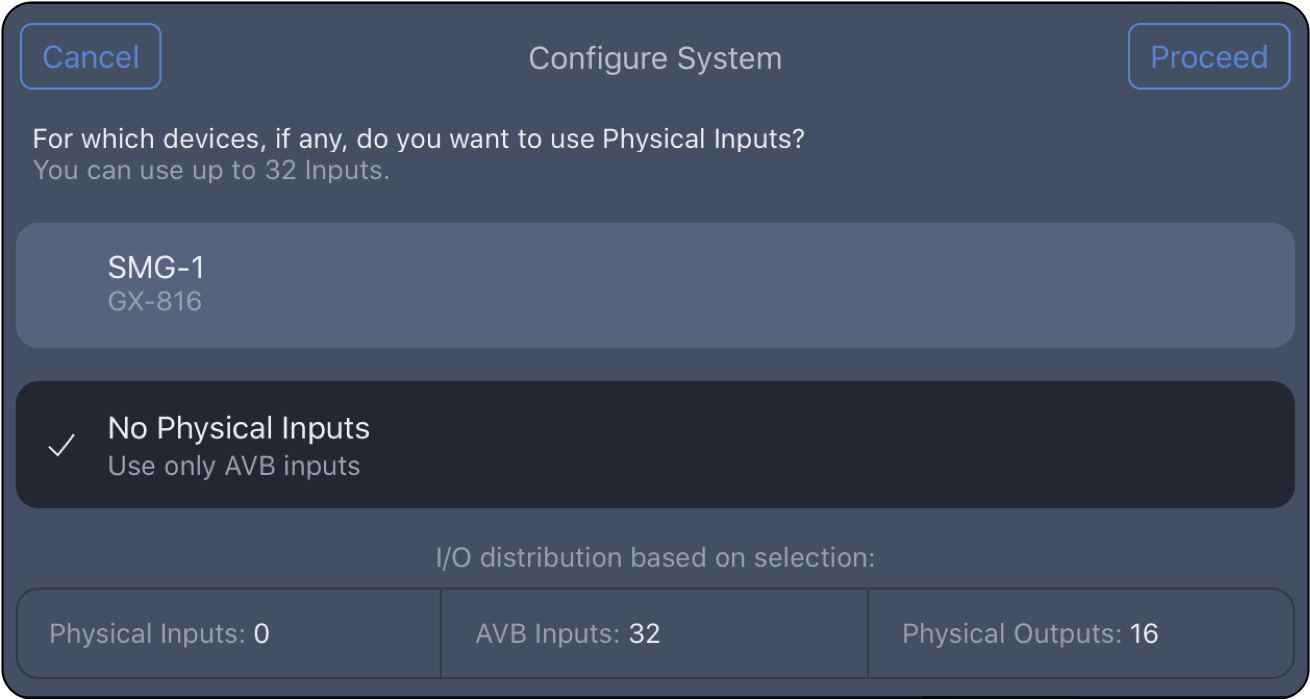
Spacemap Go – No Physical Inputs
Step 8: Tap the GALAXY processor(s) with physical audio inputs (analog or AES3).
Step 9: Select Analog or AES3, then tap ![]() buttons to adjust the total number of analog plus AES3 inputs for each processor; tap PROCEED.
buttons to adjust the total number of analog plus AES3 inputs for each processor; tap PROCEED.
NOTE: If inputs for a processor are both analog and AES3, individual signal types are selected later.
For this example, tap SMG-1 and set Physical Inputs to 4.
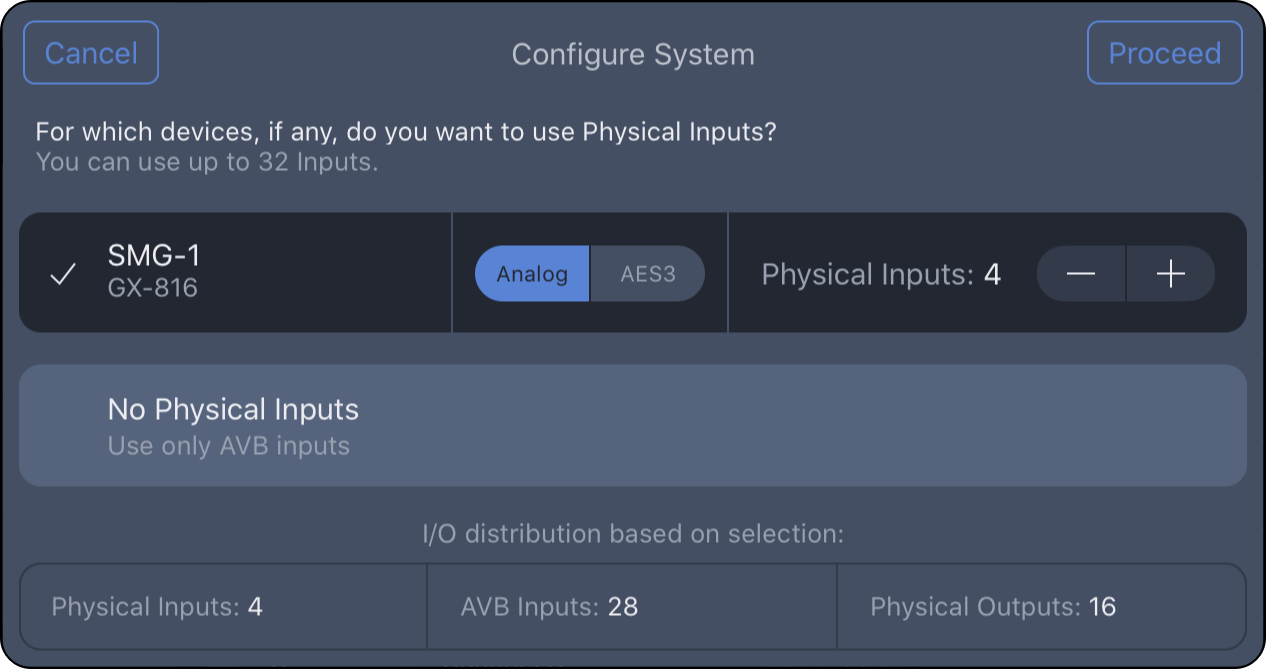
Configure System – Select Total Number of Analog and AES3 Inputs
Step 10: Use the ![]() buttons to adjust the number of AVB inputs used for the system (0–32 selectable).
buttons to adjust the number of AVB inputs used for the system (0–32 selectable).
If the system only shares analog or AES inputs, set the AVB Inputs to “0.” Tap SAVE TO SYSTEM.
For this example, 28 AVB inputs are used:
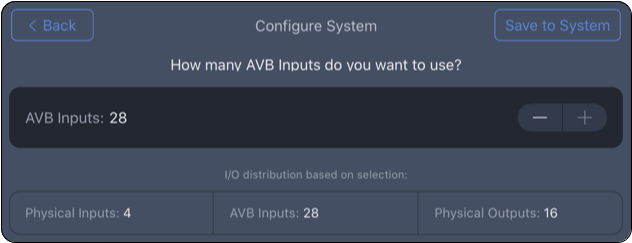
Configure System – Select Number of AVB Inputs
Step 11: Tap CONNECT AVB.
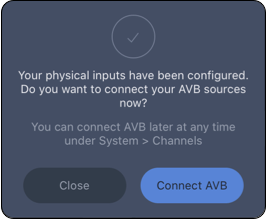
Spacemap Go App, Connect AVB Sources
Step 12: Select Analog or AES3 for individual inputs, tap UPDATE SYSTEM and confirm.
For this example: Inputs 1 and 2 are analog, Inputs 3 and 4 are AES3
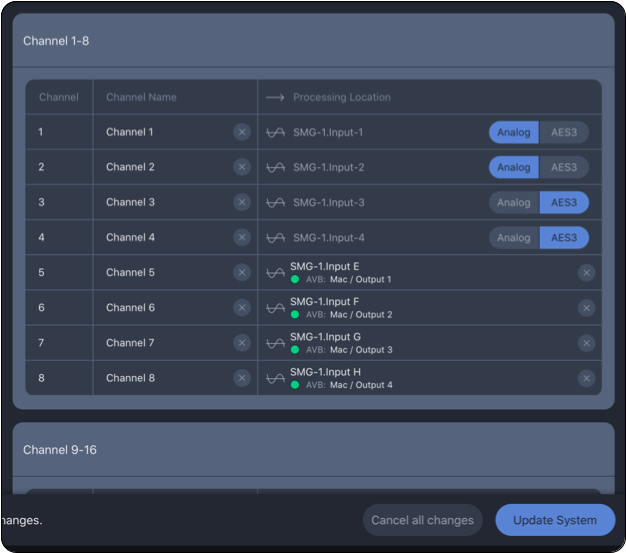
Spacemap Go – Input Type Selections for Analog and AES3
NEXT STEP: Choose either In-Use Processor or Spacemap Go Operations, below.
If the GALAXY processor settings need to be preserved, click In-Use Processor below and follow the steps listed before continuing with the Example System Configuration steps, which resume with Spacemap Go Operations, below.
If the GALAXY processor settings do not need to be preserved, proceed directly to the continuation of the Example System Configuration steps, click Spacemap Go Operations below.
In-Use Processor
From the GALAXY Configuration procedure, if a processor is part of a system that is in use, the optimization settings were stored as a Global Snapshot in Compass. This is the appropriate time to recall that Global Snapshot and save the settings to a Spacemap Go System Snapshot.
Use Step 1: Using Compass software, from the INVENTORY tab, click the OPEN button (lower-right) to open the Global Project created earlier.
Use Step 2: Select the SMG MIGRATION Global Project file; click OPEN.
Use Step 3: Click the GLOBAL SNAPSHOT OPTIONS button.
Use Step 4: Select SMG MIGRATION Global Snapshot; click RECALL.
Use Step 5: Exit the Compass software. It is not used beyond this step.
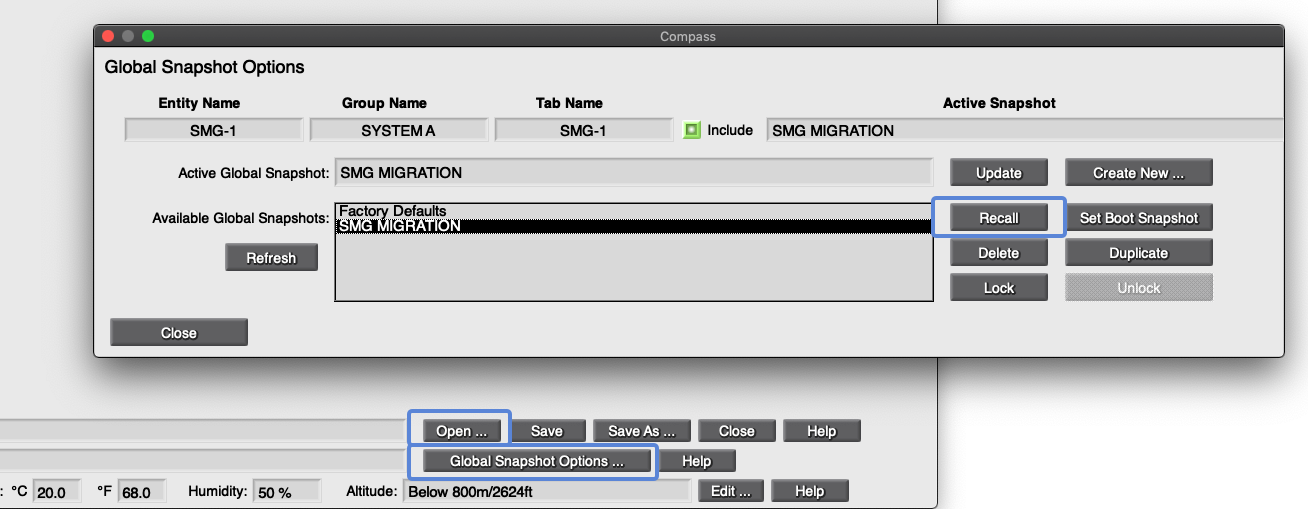
Compass Software – Open Global Project, Recall Global Project
When the Global Snapshot was recalled, the input configuration of the processor was overwritten and must be updated and saved to the User System Default Snapshot.
Use Step 6: In Spacemap Go, tap SETTINGS VEIW, tap INPUTS and RECONFIGURE INPUTS.
Use Step 7: Make physical and AVB input selections again and tap SAVE TO SYSTEM.
Use Step 8: In Spacemap Go, tap ![]() , SYSTEM SNAPSHOTS. Tap More (three-dot icon) next to User System Defaults and select UPDATE SYSTEM DEFAULT SNAPSHOT.
, SYSTEM SNAPSHOTS. Tap More (three-dot icon) next to User System Defaults and select UPDATE SYSTEM DEFAULT SNAPSHOT.
NOTE: This step captures processor optimization settings. The System Default Snapshot is automatically recalled when app is started.
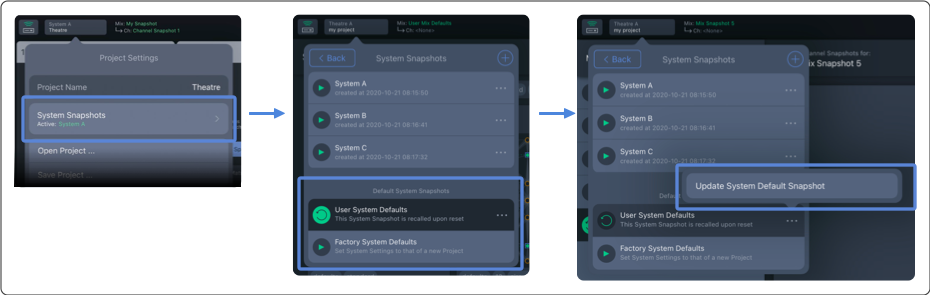
Spacemap Go, Project Settings – Update User Default Snapshot
Use Step 9: Tap ![]() and tap SAVE PROJECT
and tap SAVE PROJECT
Use Step 10: Select Save to File… and/or Save to GALAXY, tap PROCEED
Use Step 11: iPadOS: select SAVE TO FILES
Use Step 12: Add a new folder or select the Spacemap Go folder.
Use Step 13: Tap the file name to change edit it.
Use Step 14: Tap SAVE
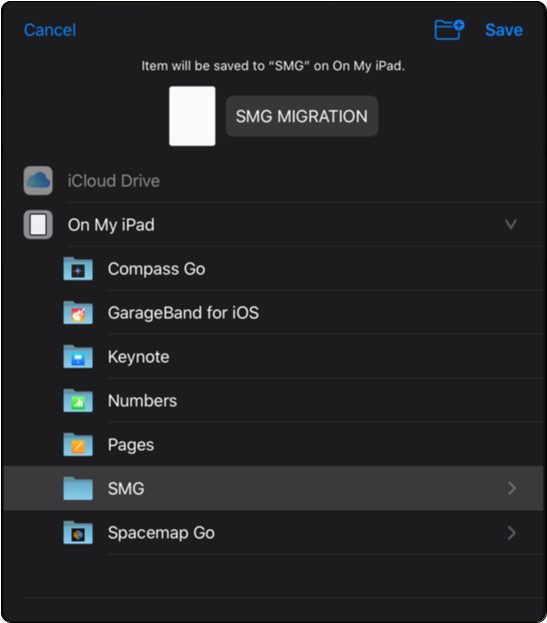
iPadOS – Save Spacemap Go Project File
Example System Configuration Steps Completed
Spacemap Go Operations
The app has a row of buttons at the bottom called Views: Mix, Channel, Setlist, Create, and Settings.
Step 13: Tap the SETLIST view.
Step 14: Tap Demo 1–8.
Step 15: Tap RECALL to confirm.
This step recalls Spacemaps and Matrix levels for inputs.
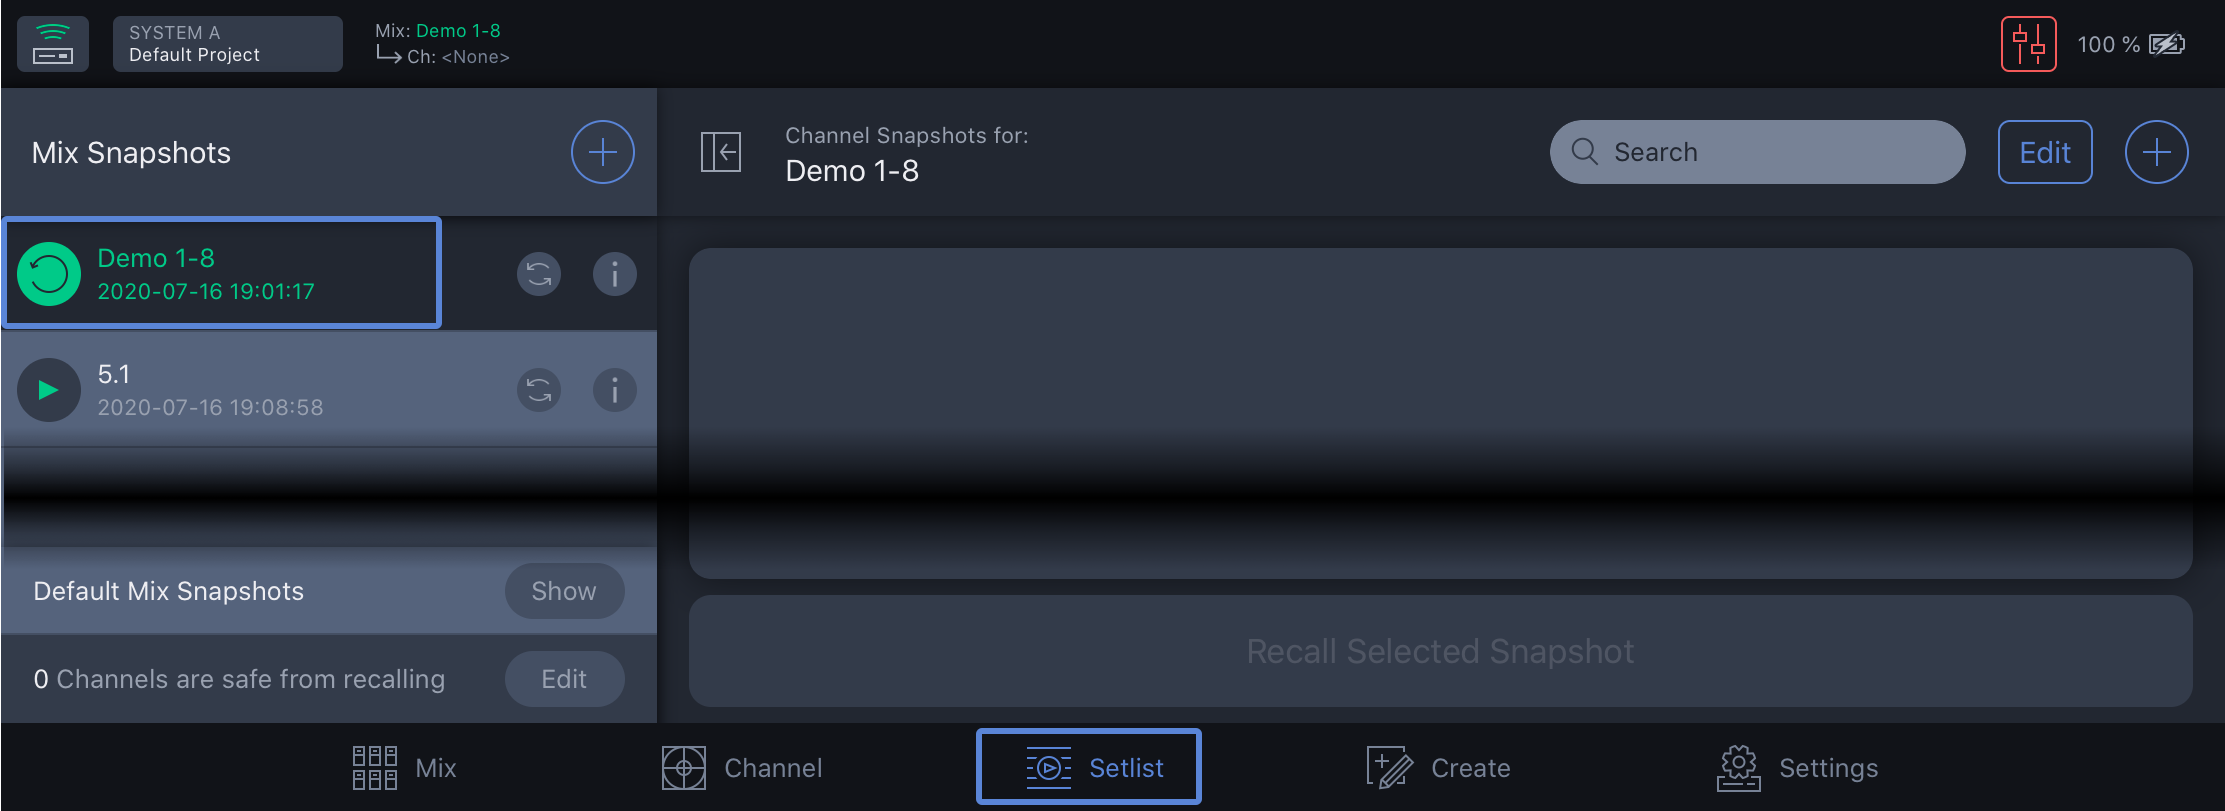
Spacemap Go – Setlist View, Select Demo 1-8
Step 16: Tap ![]() to create new Mix Snapshot.
to create new Mix Snapshot.
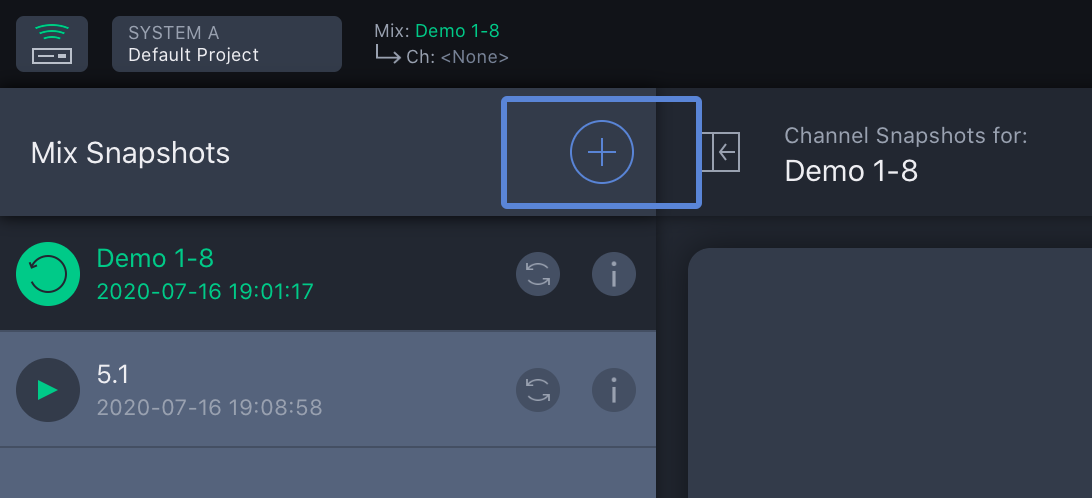
Spacemap Go – Add New Mix Snapshot
Step 17: Enter My First Mix Snapshot, tap CAPTURE.
Passing Audio
Step 18: Click ![]() and set the MIX LEVEL fader to -40 dB.
and set the MIX LEVEL fader to -40 dB.
CAUTION: This step prevents very loud sounds from being reproduced by the loudspeakers when audio is passed. There is also a MUTE button available.
NOTE: Tap drag the fader or tap the numeric value and enter a value.
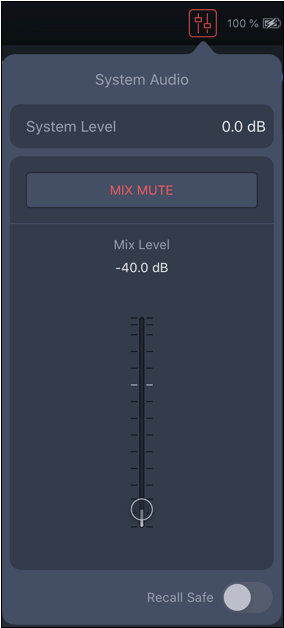
Spacemap Go – System and Mix Levels
Step 19: Tap MIX VIEW.
Step 20: Mute each input and move each input fader to -90 dB. Use the four buttons at the top to view all 32 inputs.
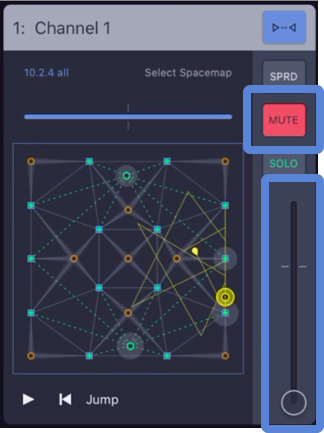
Spacemap Go – Mute and Input Fader Down
Step 21: Connect or power on the loudspeakers.
Step 22: Roll Audio! Start sending audio from the playback device(s) and confirm audio input levels.
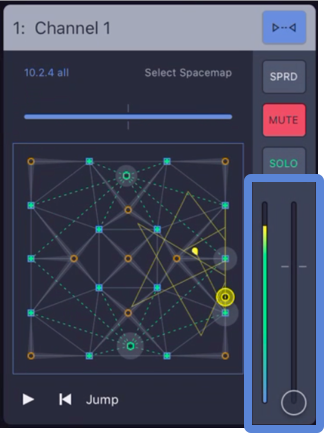
Spacemap Go – Input Meter and Input Fader
Check Inputs and Adjust Mix and System Levels
Similar to an input of a console, unmute each input and slowly raise the input fader. If the fader of the channel cannot be comfortably set to the nominal (0 dB) level, increase or decrease the Mix Level accordingly. Listen for the expected output.
One way to use the Mix and System Level is to treat the Mix Level as a “master fader” of the system and the System Level as a system-wide offset. Once the inputs are confirmed and a relative listening level is established, set the System Level to match the Mix Level and return the Mix Level to nominal (0 dB) for better fader resolution during operation. The Mix Level is stored with a Mix Snapshot. The System Level is saved with a System Snapshot.
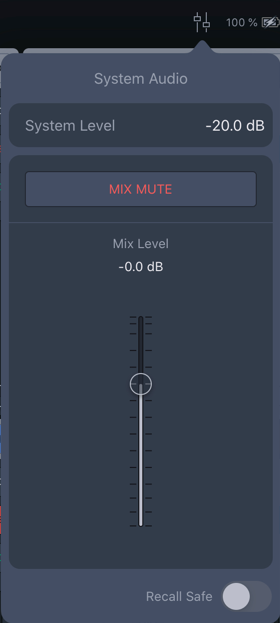
Spacemap Go – System Levels
Next Steps
It is time to start experimenting, learning as you go. Treat Spacemap Go like a new console— pass some audio, push some buttons, and try things:
- Move the Spacemap Panner for each channel.
- Push the PLAY button on an input with a Trajectory to start auto-movement of the Spacemap Panner.
- Open the Channel view to edit the Spacemap, Trajectory, or Matrix levels.
All right, you are passing audio! At this point, the Speaker Nodes in the Spacemaps may not be assigned or laid out like they are in the room. It may seem like sound is coming from the wrong loudspeaker or that the panning does not make sense. Do not worry, we will get to that soon. Before creating an amazing effect, we should learn a little more about workflow, operations, and saving; there is even a section about immersive loudspeaker system design. Please continue reading…
Simple Troubleshooting
If sound is not being reproduced by the loudspeakers, please check:
- Input metering is indicated next to channel in Mix View (to the right of the Spacemap of each channel).
- Mix or System level is not too low or muted.
- Mix View, for a channel receiving input, move the Spacemap Panner so that a Speaker Node with a connected loudspeaker indicates level.
- Loudspeakers are connected to assigned processor outputs (for Demo 1-8 Mix Snapshot, Spacemap Go Ch 1-2 have Speaker Nodes associated with processor outputs 1-14).
- Loudspeakers are powered on, patched.
At this point, if there is no sound coming from your loudspeakers, please contact us! Not only would we like to help you get things working, but we may also discover ways to make improvements to the app.
What’s Next?
Please visit Operations next.