Channel View
Spacemap Go Help
The Channel View presents all of the controls for a single Spacemap Go channel to the user.
Fundamentally, Spacemap Go controls the Summing Matrix cross-point levels of Galileo GALAXY processors. Each Spacemap Go Channel represents a GALAXY processor input. Each input can be routed to any output at any level between -inf and 0 dB. The system outputs are represented as Speaker Nodes in the app.
For each channel, the Summing Matrix cross-point levels can be changed using one of three methods:
- Real-time gesture control of the Spacemap Panner.
- Automated control, using a Trajectory (predefined path) that the Spacemap Panner follows.
- Enter summing matrix cross-point levels.
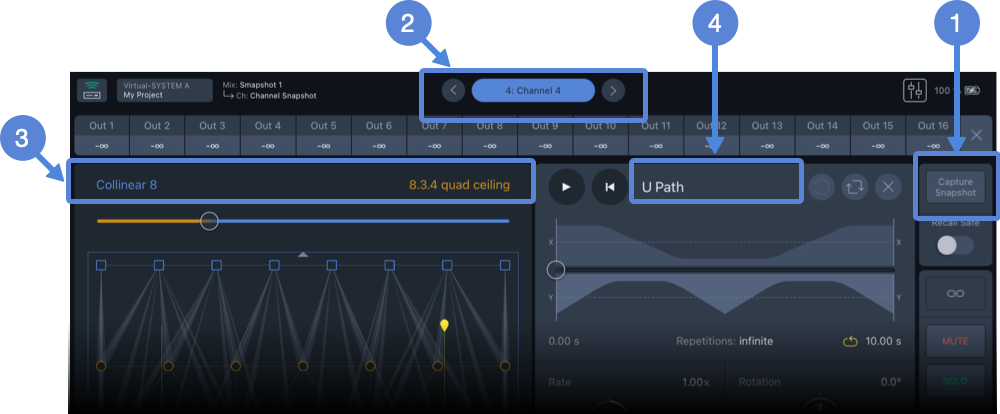
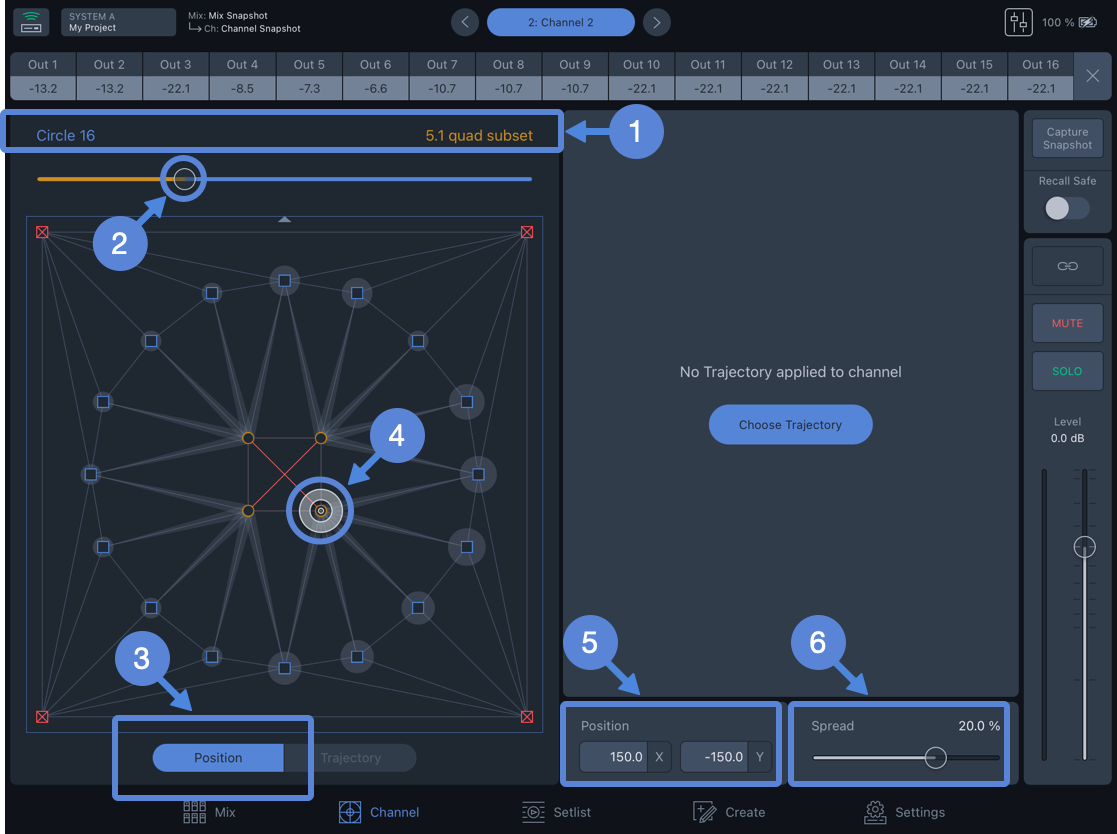
Channel View – Capture Channel Snapshot(1), Channel Navigation(2), Spacemap A & B (3), and Trajectory (4)
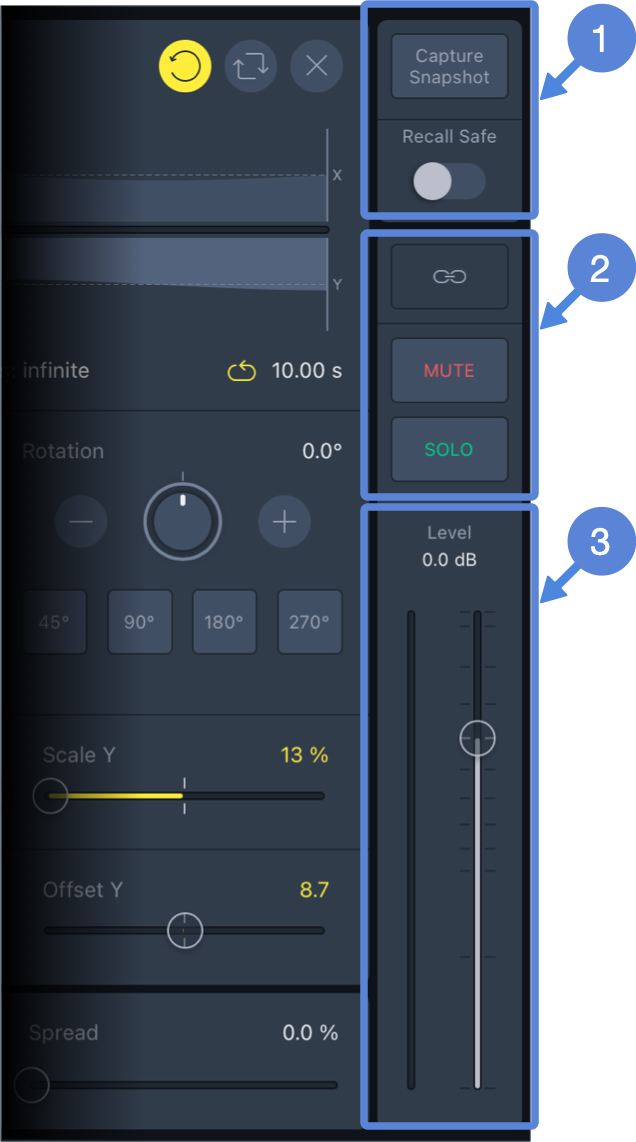
The settings of individual channels or groups of channels are stored and recalled using Channel Snapshots (Mix View). Individual Channel Snapshots can be created in the Channel View by tapping the Capture Snapshot button,
Use the navigation buttons to display the next or previous channel, ![]() above. Tap the channel name to open the channel selection pop-over. Tap-hold the channel name to edit.
above. Tap the channel name to open the channel selection pop-over. Tap-hold the channel name to edit.
Each channel can have one or two Spacemaps ![]() and one Trajectory,
and one Trajectory, ![]() above.
above.
Tap the name of a Spacemap or Trajectory to open the library, make another selection or select none.
Summing Matrix Levels
For each channel, tap an output to manually enter a summing matrix cross-point level, routing the input signal of the channel to the selected processor output at the level entered. Swipe left/right to display additional outputs. Levels entered are overwritten if a Spacemap is added to a channel and the Panner is moved.
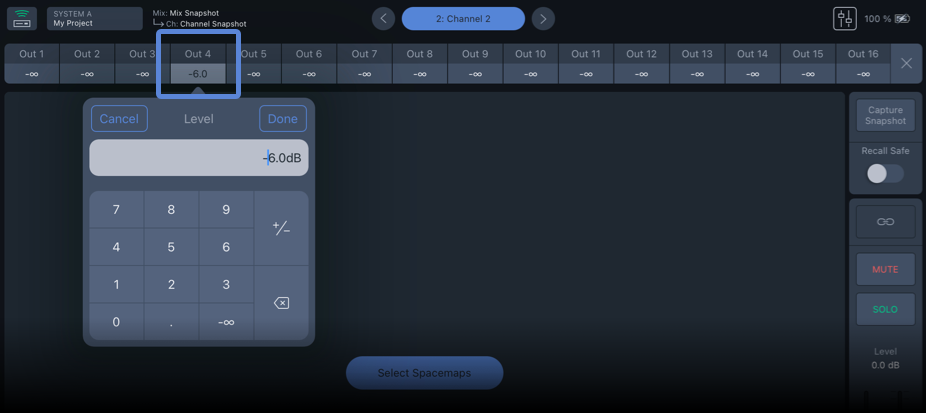
Tap Output to Enter Summing Matrix Cross-point Level
Add Spacemaps
Channels do not have Spacemaps selected initially. Each channel can use two Spacemaps. To select Spacemaps for a channel, tap ![]() in Mix View or Channel View. Then, tap either of the Add Spacemap buttons (below, left) to open the Spacemap library, which includes factory examples and user created Spacemaps (below, right). Swipe up/down to scroll the Spacemap library.
in Mix View or Channel View. Then, tap either of the Add Spacemap buttons (below, left) to open the Spacemap library, which includes factory examples and user created Spacemaps (below, right). Swipe up/down to scroll the Spacemap library.
Use the Create View to add user-created Spacemaps to the Snapshot Library.
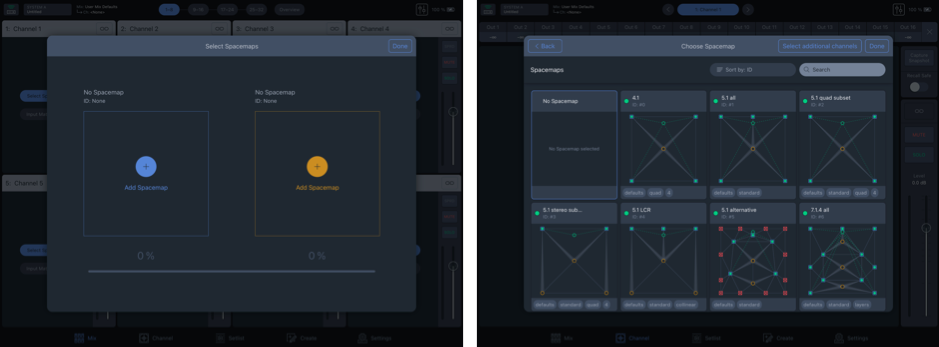
Select Spacemaps Pop-Over – Tap Either ADD SPACEMAP Button (left), Spacemap Library, Select a Spacemap (right)
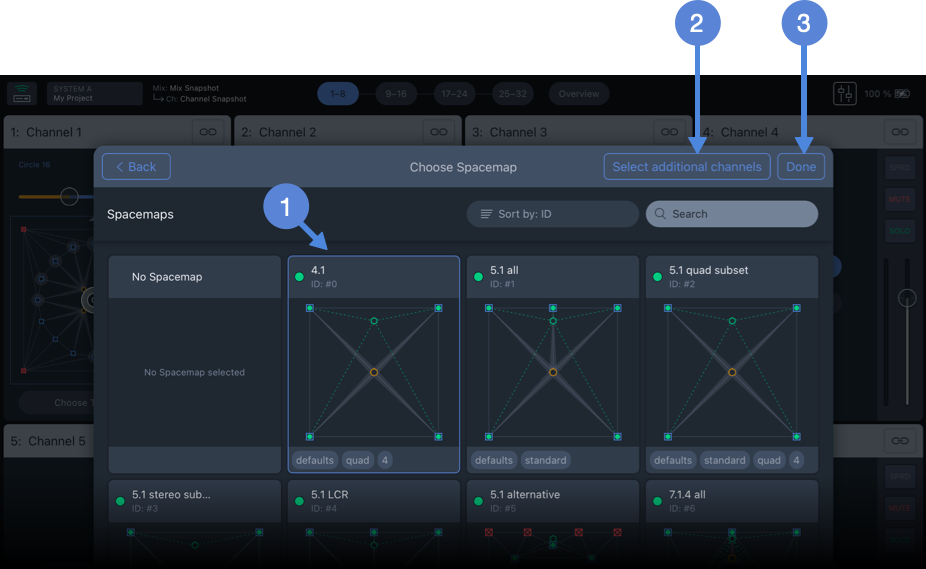
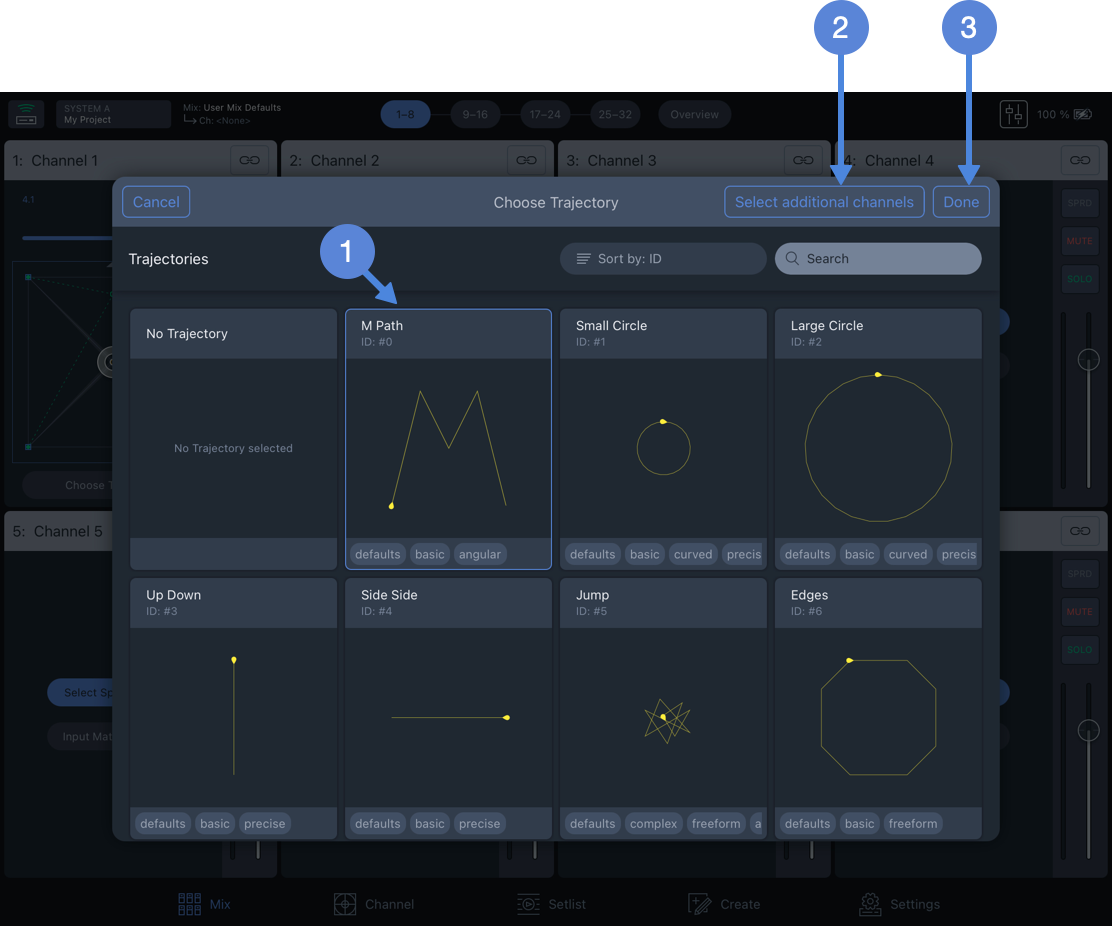
Choose Spacemap Pop-Over – Tap a Spacemap, SELECT ADDITIONAL CHANNELS or DONE to Add the Spacemap to the Channel.
Tap a Spacemap to select it, ![]() above, then tap SELECT ADDITIONAL CHANNELS
above, then tap SELECT ADDITIONAL CHANNELS ![]() to add the Spacemap to multiple channels or tap DONE
to add the Spacemap to multiple channels or tap DONE ![]() to add the Spacemap to the channel.
to add the Spacemap to the channel.
Channel View, Two Spacemaps Assigned, No Trajectory
Add a Trajectory
Use the Create View to add user-created Trajectories to the Trajectory Library.
A Trajectory is defined movement path for the Spacemap Panner. When a trajectory is selected, a yellow line representing the movement path is overlaid on the Spacemap and the Trajectory controls are displayed on the right side of the Channel View.
Channels do not have Trajectories selected initially. Each channel can be assigned one Trajectory. To select a Trajectory for a channel, tap ![]() in either Mix or Channel View to open the Trajectory library, which includes factory examples and user created Trajectories. Swipe up/down to scroll the Trajectory Library.
in either Mix or Channel View to open the Trajectory library, which includes factory examples and user created Trajectories. Swipe up/down to scroll the Trajectory Library.
Select Trajectory Pop-Over – Tap a Trajectory, SELECT ADDITIONAL CHANNELS or DONE to Add the Trajectory to the Channel.
Tap a Trajectory to select it ![]() , then tap SELECT ADDITIONAL CHANNELS
, then tap SELECT ADDITIONAL CHANNELS ![]() to add the Trajectory to multiple channels or tap DONE
to add the Trajectory to multiple channels or tap DONE ![]() to add the Trajectory to the channel.
to add the Trajectory to the channel.
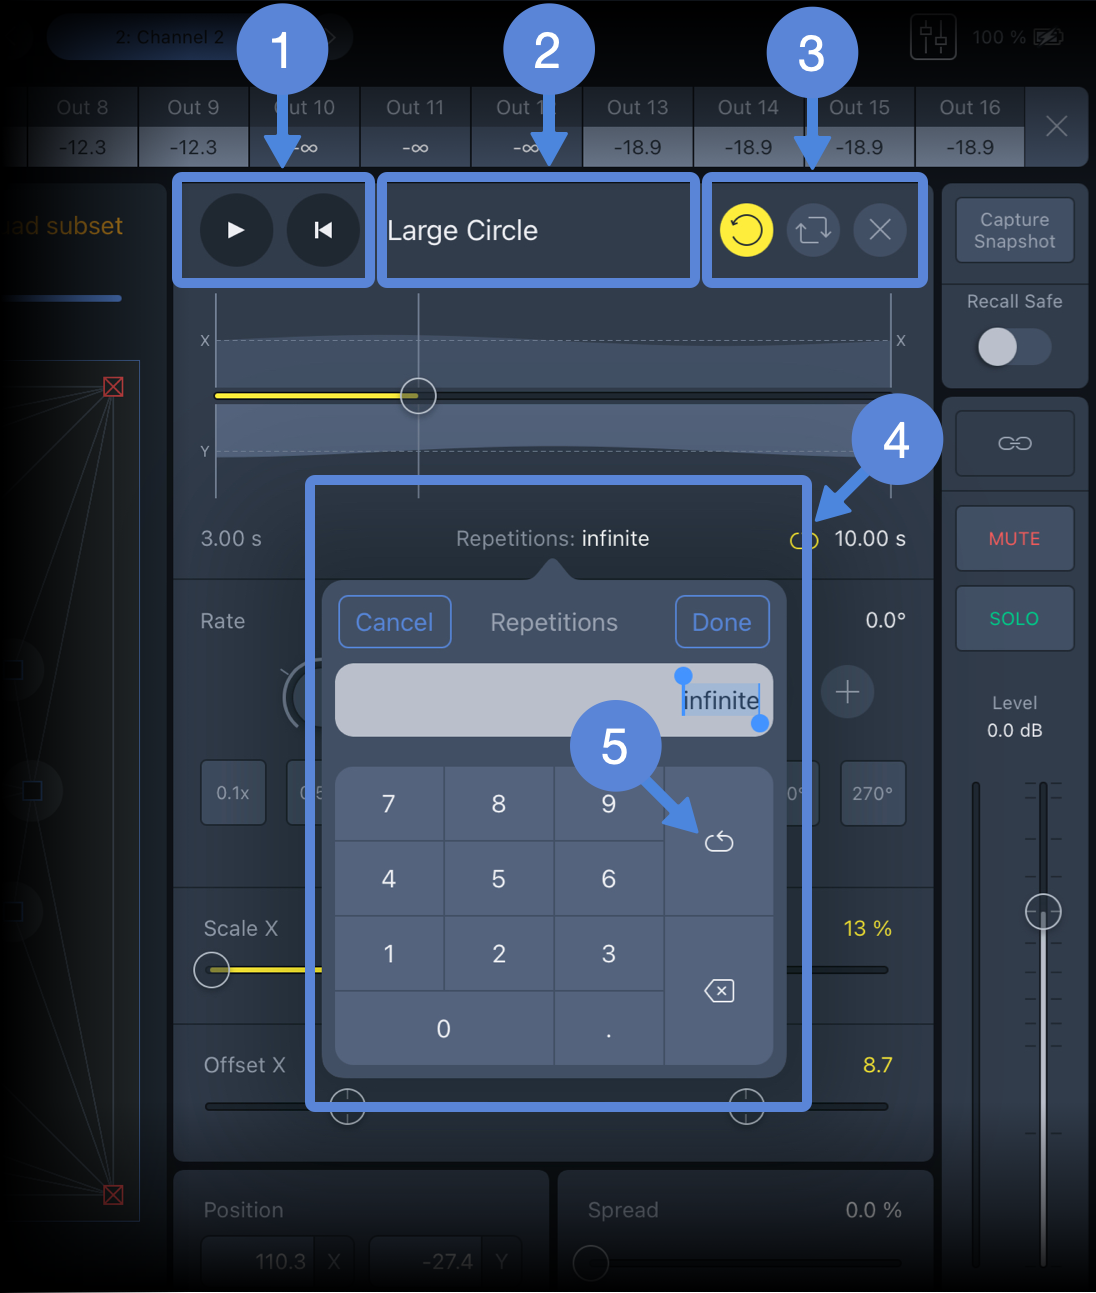
Channel View – Trajectory Controls
![]() PLAY: Starts the Spacemap Panner following the Trajectory.
PLAY: Starts the Spacemap Panner following the Trajectory.
Restart: Stops the Trajectory if playing, resets the play head to the beginning of the Trajectory timeline.
![]() TRAJECTORY: Tap to select another Trajectory or none.
TRAJECTORY: Tap to select another Trajectory or none.
![]() RESET: Opens pop-over, select: Reset All, Rate, Scale, or Offset.
RESET: Opens pop-over, select: Reset All, Rate, Scale, or Offset.
CHOOSE ANOTHER: Tap to select another Trajectory or none.
REMOVE: Removes the Trajectory from the channel.
![]() REPETITIONS opens pop-over, enter number of times to repeat or infinity
REPETITIONS opens pop-over, enter number of times to repeat or infinity ![]() .
.
Tap the TRAJECTORY button to enable gestures to modify the Trajectory path overlaid on the Spacemap.
Use one-finger gestures to move the Trajectory, two-finger pinch/expand to scale, and two-finger twist to rotate.

Trajectory Movement
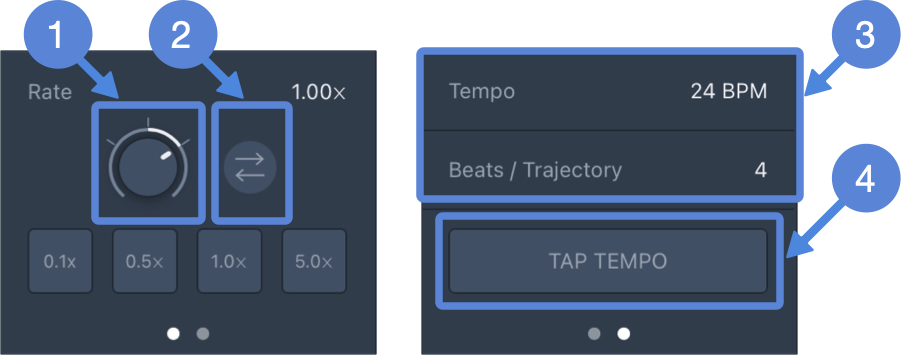
To switch between Rate and Tap Tempo controls, swipe left/right on the pane.
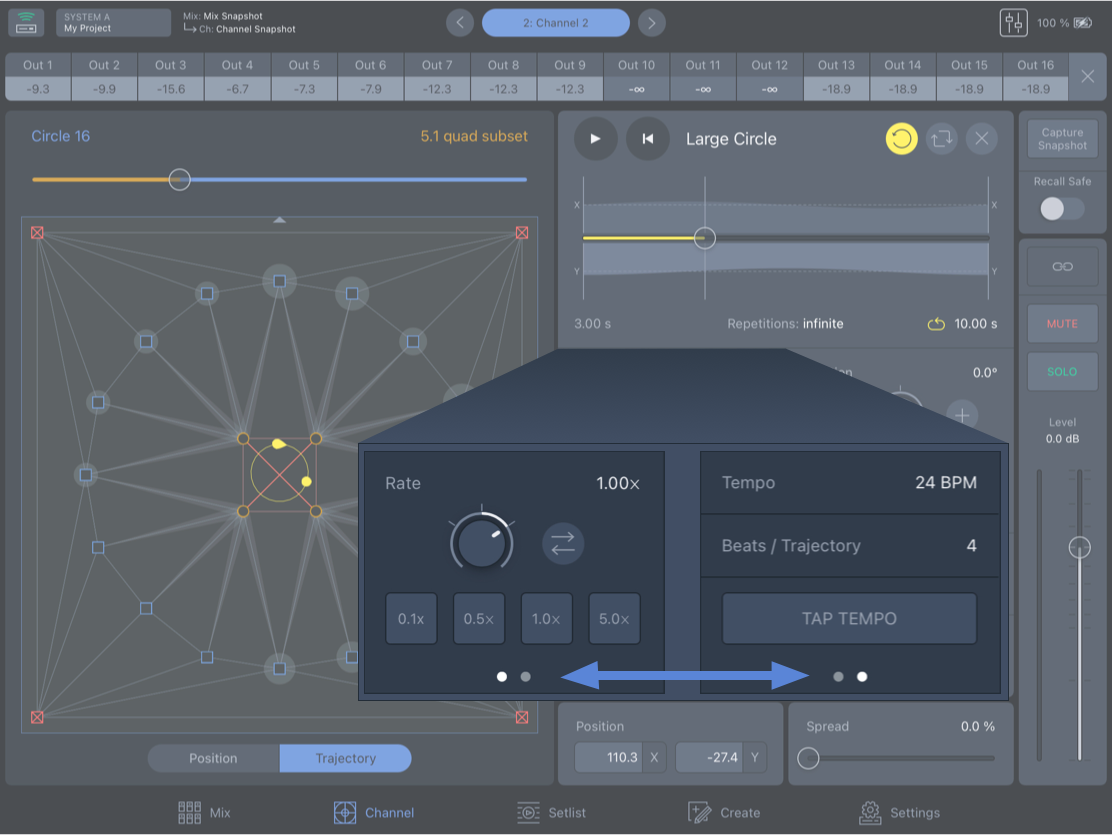
Channel View – Swipe Left/Right to Switch Between Rate and Tap Tempo Controls
Channel View, Trajectory – Rate and Tempo Controls
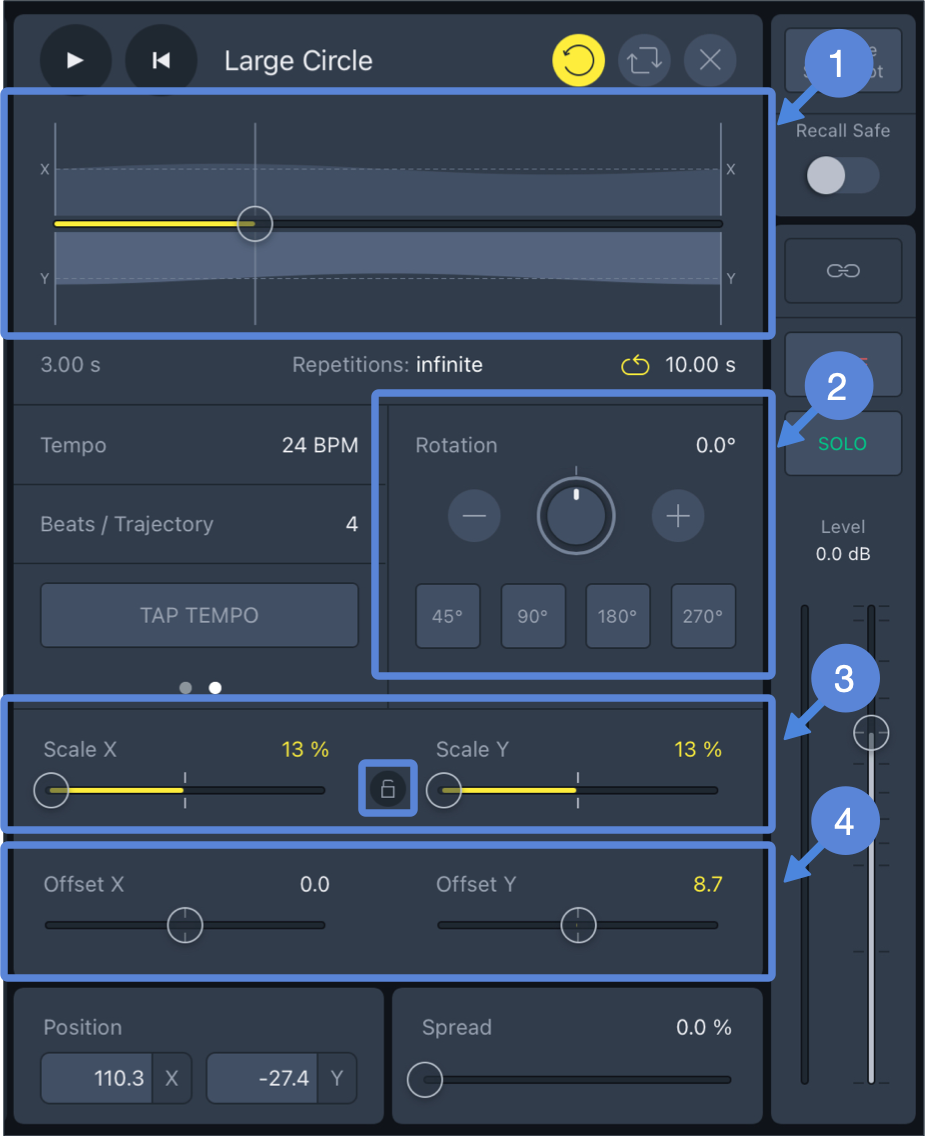
Channel View, Trajectory – Timeline and Rotation, Scale, and Offset Controls
NOTE: If the Spacemap area is exceeded by the Trajectory, it will change shape, respecting the boundary.
Channel Controls
Channel View, Duplicate Controls Available in Mix View
RECALL SAFE: Prevents overwriting of the channel settings when either type of Snapshot is recalled. The Recall Safe state is not stored when Channel Snapshots, Mix Snapshots, or Projects are created or saved.
![]() LINK, MUTE, SOLO: Are duplicate controls, also available in Mix View.
LINK, MUTE, SOLO: Are duplicate controls, also available in Mix View.
![]() LEVEL and INPUT METER: Are duplicate controls, also available in Mix View.
LEVEL and INPUT METER: Are duplicate controls, also available in Mix View.
What’s Next?
Please see Setlist next.